Barbecue Potato Chips (crisps)
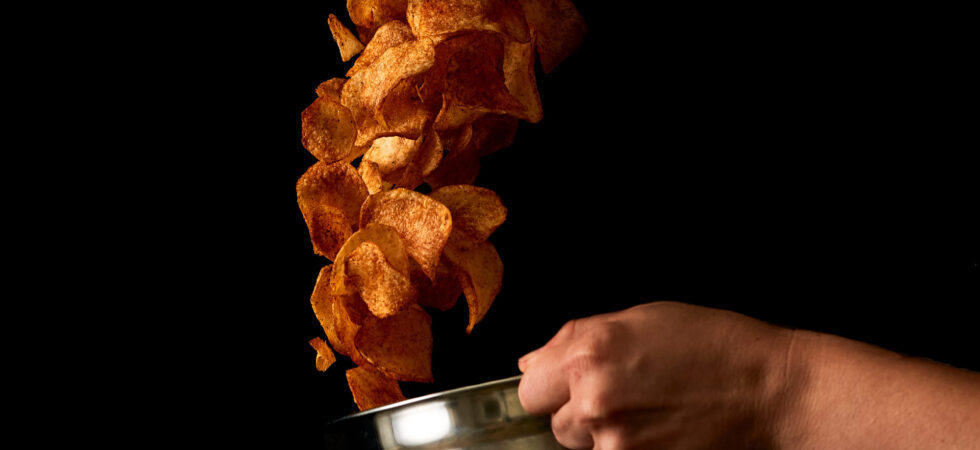
You know how the best barbecue is served plain? I feel the exact opposite about potato chips (crisps). It’s not good enough to just have a plain potato chip. And there is no better way to test a recipe developer’s snacking mettle than with barbecue potato chips. It doesn’t hurt that one of my biggest snacking weaknesses is barbecue potato chips. 😉
Let’s be honest, it was only a matter of time before I developed a recipe. I’m happy to say these barbecue potato chips are crispy, smokey, and tangy with a lingering sweet heat. And they are at the top of my snack list.
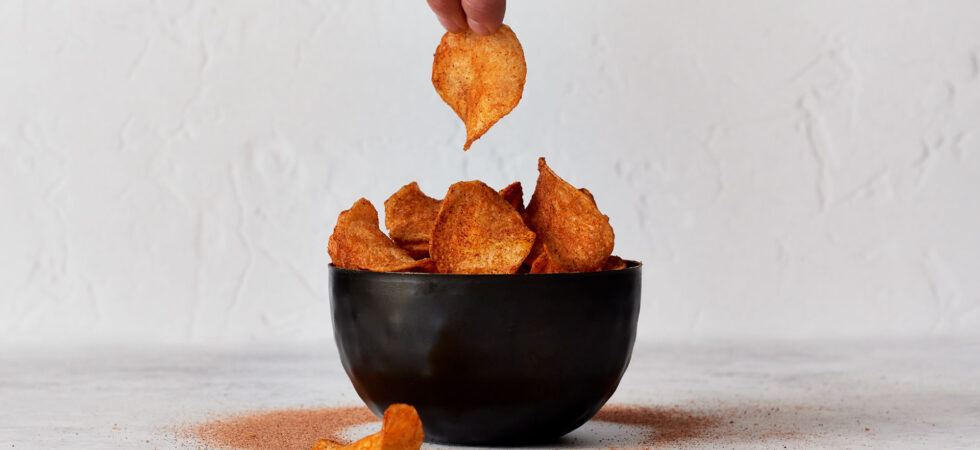
Get the Recipe: Homemade Barbecue Potato Chips (Crisps)
Ingredients
Potato Chips (crisps)
- 3 medium russet potatoes
- 6 cups water
- 1 cup white distilled vinegar
- canola oil, for frying
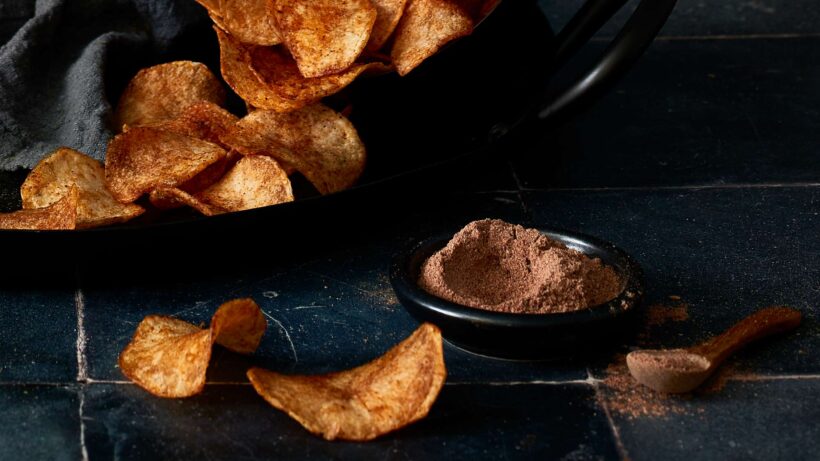
Barbecue Seasoning
- 1 tablespoon chili powder
- ½ tablespoon sweet paprika
- ¼ teaspoon chipotle powder
- ¼ teaspoon mesquite powder
- 1 teaspoon ground cumin
- ¼ teaspoon black lime powder
- 1 teaspoon garlic powder
- 1 teaspoon onion powder
- 2½ teaspoons confectioner's sugar (icing sugar)
- 1 tablespoon kosher salt
Equipment
- 1 large bowl
- 1 vegetable peeler
- 1 food processor with slicer attachement (see notes)
- 1 small bowl
- 1 kitchen scale (optional)
- clean kitchen towels or paper towels
- 1 large Dutch oven (see notes)
- 1 spider, mesh strainer, or slotted spoon
- 1 candy or instant read thermometer
- 1 tray or bowl for cooked chips
Instructions
- In a large bowl, combine the water and vinegar and set it aside.
- Peel and rinse all of your potatoes and then slice them using the slicer attachment and large chute of a food processor. You want the slices to be about 1/16in (.16cm) and uniform. Add the slices to your water/vinegar mixture and let them soak for 20 minutes.
- While the slices soak, go ahead and mix together the BBQ seasoning into a small bowl. Then, set the seasoning aside.
- When ready, dry the slices by sandwiching them between kitchen towels or paper towels. Take care not to overlap slices. You want to get rid of as much moisture as possible before frying.
- While the potato slices dry out, pour canola oil into an enameled Dutch until it's about 2-3in (5-7.5cm) high. Turn the burner to medium high-high and heat the oil to between 360-375°F (182-190°C). Keep a thermometer handy to check temps before and during cooking.
- Prepare some more paper towels on a baking sheet or large shallow bowl and get your seasoning ready.
- Add as many potato slices as will create a single layer over the top of the oil to a spider or large slotted spoon; typically, somewhere between 1/2 and 1 full potato. It's okay to stack the slices at this point, because it's more important that all of the potato slices go into the oil at the same time for even cooking.
- When you add the slices, they will bubble quite a bit. Gently stir continuously to stop hot spots, separate any slices that stick together, and make sure the hot oil is hitting each chip (crisp) equally. The temperature will drop considerably once you add the slices. You want the oil's temperature to drop into the 275-285°F (135-141°C) range during the first 2 minutes of frying. Stir until the slices have stopped bubbling almost completely, about 3-4 minutes. The oil temperature should end somewhere between 300-315°F (149-157°C).
- Scoop the potato chips (crisps) out of the oil and add them to the prepared paper towels. Directly after, sprinkle the chips with seasoning and transfer them to a bowl for serving.
- Wait for the oil temperature to rise all the way back up before repeating the next batch. Repeat frying and seasoning until all the slices are gone.
- Once all your batches are done and cooled off a bit, check your seasoning with all of the barbecue potato chips (crisps) together. Powders stick pretty well, even after the chips have cooled a bit. If you want a more even seasoning or want to add a second coat for funsies, sprinkle more seasoning over the top. Then scoop and toss with your hands a bit before adding any more seasoning. Continue to toss until you are happy with the result.
Notes
- Feel free to leave on the peel for a more rustic aesthetic. Just make sure to give the potatoes a good scrub before slicing them.
- If you don’t have a food processor with the ability to thin slice foods, you can use a mandolin.
- The amount of oil you need is determined by the size and shape of your pot or pan. Go by the depth of oil provided in the instructions over a specific amount.
- Leftover seasoning? No problem. Add to your next round of roasted veggies or wings.
- Wait until the chips are completely cool before storing them in an airtight container or bag at room temperature. They should stay fresh for about a week.
Nutrition
Frequently Asked Questions
If you don’t have a food processor with a slicer, you can use a mandolin.
I would not recommend using a knife, because uniformity is key to this recipe. Everything needs to cook through at the same rate and manually adjusting will make that very difficult.
Most of these spices can be found at your local supermarket. There are only 2 spices you might have an issue local sourcing if you don’t live in a big city, mesquite powder and black lime powder. Thanks to the power of the internet, you can purchase them from The Spice & Tea Exchange.
The mesquite powder is necessary in my opinion, but you can probably substitute sumac for black lime powder. It’s not exact or as intense as black lime powder, but they have a similar flavor profile.
Looks like it’s time for a science lesson.
TLDR: Soaking the slices in water leeches some of the starches out of the potatoes before frying, which helps them crisp up better and slows down browning. Including vinegar in that soak adds flavor and slows browning down even more so.
The long answer: The Maillard reaction happens at temperatures over 300°F (150°C)
It’s a heat-based reaction between amino acids and reducing sugars to create compounds like melanoidins. This reaction is what creates the brown color and savory flavors in things like steak, roasted veggies, and potato chips!
The less sugars (carbohydrates) there are to reduce at high temperatures the longer it takes for the chips to turn from golden to dark brown. So, soaking the slices in liquid and leeching their starches into the water, reduces the sugar and thus the Maillard reaction.
The Maillard reaction is also sensitive to pH levels. By adding vinegar to the soaking liquid, we reduce the pH and make the solution more acidic. The more acidic something is the longer it takes for the Maillard reaction to occur. Pretzels and bagels are great examples of the connection between pH and the Maillard reaction. During the process of making them, they are boiled in a very alkaline solution (with lye or baking soda) to increase browning. In this instance, increasing the acidity of the potatoes does the opposite of what happens to bagels and pretzels. It keeps them from browning quickly and gives them longer to crisp up without burning.
I do recommend following the ratio of water to vinegar to potatoes 6c:1c:3 potatoes (1.4L:240ml:3 potatoes).
– If you keep the same amount of water and vinegar and add more potatoes, the water will be starchier (more sugar on the potato while cooking) and lead to browner chips (crisps).
– If you use less vinegar, you will also get browner chips (crisps) but with more potato flavor.
I like the light tang the chips (crisps) get and think it really helps with overall flavor. You could literally eat these with no other seasonings because you are adding some brightness on the front end.
Play around with what you like!
For frying, I prefer an enameled Dutch oven for 2 reasons: 1. to keep any splattering safe below the lip of the pot and 2. to retain heat. But you can still make it work if you don’t have that.
The second-best option is probably a carbon steel wok, followed by a stainless-steel pot. Just make sure you are very aware of your oil’s temperature before, during, and after you fry the potato slices.
The size of the pot in diameter is also fairly important. Just like with sauteing or shallow frying, it’s not a good idea to crowd the pot if you want better heat control and even frying. The more surface you have the more potato slices you can fry at one time.
1. Dry off as much water from the potato slices as possible before frying. Water and oil do not mix and any pooled water on the surface of a chip will splatter instead of just bubbling.
2. Use a thermometer! I use a digital probe thermometer, but a candy thermometer would be a great hands-free way to keep track.
I supplied temperature ranges to help guide your through the cooking process. There is going to be huge dip in temperature when you add the potatoes, and the material and size of your cooking vessel as well as ratio of potato slices to hot oil are going to contribute to how much of a change you see. You may need to adjust your start temperature, so the initial drop range and end of cooking range are reached at the right time.
Calibrate as you go and know that this process is actually very forgiving because of the vinegar soak. You can still turn out delicious product as long as you keep stirring and keep an eye on the bubbles. I’d only be concerned if it takes more than 6 minutes to cook the chips. That means your oil temperature is too low, and you will end up with oily and hard chips. bleh.
3. Use the bubbles as a guide. The chips will only bubble in oil if there is still moisture present. A few bubbles clinging to a chip isn’t a big deal: I’m talking about active bubbling. If you take a chip out of the oil when it’s still actively bubbling that spot on the chip will be soft. Of course, if a chip looks like it’s going to burn, take it out of the oil regardless of the bubbles on its surface. You shouldn’t have that issue unless the oil is too hot during cooking.
First things first…DO NOT POUR OIL DOWN YOUR DRAIN! It can cause all sorts of issues with your pipes.
You have 3 options to choose from when deciding what to do with the fry oil from your barbecue potato chips:
1. Strain and reuse the oil 2-3 more times. Chips don’t have a lot of debris (like breading), and they are a vegetable, so animal fats and by-products aren’t getting introduced to the oil. You can pour the cooled oil into a glass container and keep it in your pantry until you use it again. Fair warning oil stored at room temperature will last about a month before it starts to go rancid. In the refrigerator, oil can last up to 3 months. And you have about 1 year if stored in the freezer.
2. Pour the oil into a container you already plan to throw away. seal it closed and take it out with the trash.
3. Add flour to the oil and mix until it’s sludge. Then, throw it away.


There may be affiliate links in this post. A Little Spoon, LLC is a participant in affiliate advertising programs designed to help content creators earn fees by linking to affiliated sites.