Brioche Cinnamon Rolls
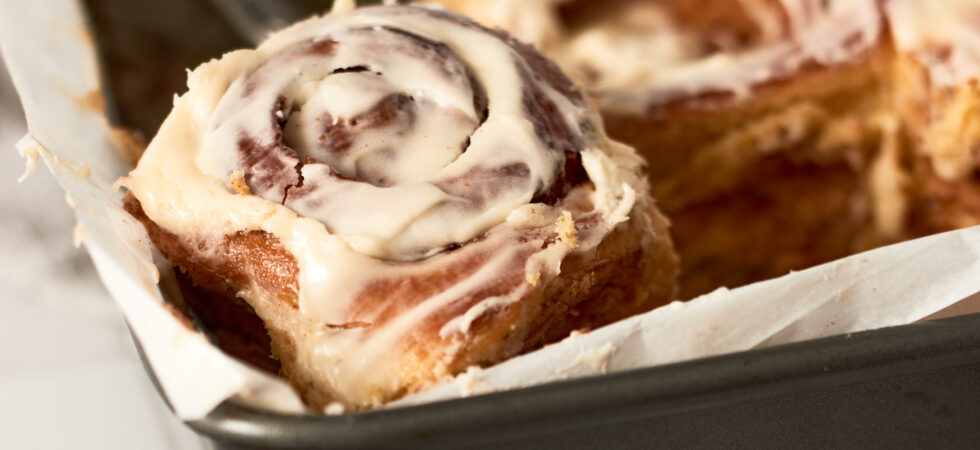
These Brioche Cinnamon Rolls will be the best cinnamon rolls you’ve ever had. You think I’m exaggerating, but I’ve yet to find any that top them. Even from bakeries!
Here’s what makes these standout:
- High-Hydration, Brioche dough: I know brioche takes time, but it is absolutely worth it! It gives these cinnamon rolls a very light and tender crumb.
- Cinnamon and brown sugar sprinkled over top butter: I have yet to get the mixed paste to work without running out of the rolls. My version gives a prominent ribbon of cinnamon filling (and a hint of nutmeg).
- Mascarpone in the frosting: A subtler mascarpone and cream cheese frosting is where it’s at. It really lets the cinnamon rolls shine!
Hot take, I am not a fan of straight cream cheese frosting or gooey under-baked cinnamon rolls. But, before you fight me, I made notes for those of you who love one or both of those things. Because everyone deserves to get what they want out of a recipe. 😉
Get the Recipe: Brioche Cinnamon Rolls
Ingredients
Brioche Ingredients
- ¾ cup warm milk
- ¼ cup honey of choice
- ½ tablespoon active dry yeast
- ½ tablespoon kosher salt
- 4 eggs
- 3¾ cups all purpose flour , (plus more for dusting)
- ¾ cup unsalted butter , softened (plus enough to prep a bowl and baking pan)
Filling Ingredients
- 10 tablespoons unsalted butter, room temperature
- 1 cup brown sugar, packed
- 2½ tablespoons ground cinnamon
- ¼ teaspoon fresh nutmeg, grated
- ½ teaspoon kosher salt
Icing Ingredients
- 2 ounces cream cheese
- 2 ounces mascarpone cheese
- 2 teaspoons vanilla extract
- 1¼ cups powdered sugar
- ¼ teaspoon kosher salt
- 1 teaspoon lemon zest
- ¼ teaspoon orange blossom water , optional
- 1 teaspoon cognac or other brandy , optional
Equipment
- 1 stand mixer with whisk and dough hook
- 1 thermometer (optional)
- measuring Cups
- Measuring spoons
- silicone spatula
- 1 very large bowl
- press and seal or cling wrap (cling film)
- parchment paper optional
- 9 x 13 pan
- Rolling Pin
- 1 ruler
- twine, floss, or fishing line optional
- a serrated knife optional
Instructions
- First, bring your butter and eggs to room temperature by placing them on the countertop for roughly 30 minutes before you start. To quicken things along and prep for later, slice the butter into roughly 1tbsp (14.2g) pats.
- Next, whisk the milk and honey together in a sauce pot on your stove top. Turn the heat to low and bring the mixture to about (125°F or 51°C), then pour the milk and honey into your mixing bowl.
- The temperature should come down once it hits a cold bowl. Use a thermometer to make sure the temperature has fallen between 110-115°F (43-46°C). Once you are in that window, add in the active dry yeast and let it rest for 10-15 minutes, so it can bloom.
- While that’s working, measure out the flour and salt and set aside. Also, very lightly butter a large bowl for proofing the dough later.
- When the yeast has bloomed, turn on the mixer with the whisk attachment and add in the eggs. Once incorporated, add in salt and then flour a little at a time until it's about the viscosity of batter.
- Switch out the whisk attachment for a dough hook and continue mixing in the flour until it comes away from the sides of the bowl; It may take upwards of 15 minutes. At this point you can begin to add the butter pieces one-at-a-time. Once one mixes into the dough fully, you can add the next until all of the butter has been added.
- Continue mixing until the dough gets shiny and smooth and you can gently touch it without it immediately sticking to your fingers. It may need another 10 minutes of mixing to get to this stage. At any point, you can stop to do a windowpane test, to see if the dough is ready to to proof. Get your hands slightly wet and pull some of the dough up to see if it gets thin enough to see light through it without breaking. When you can do that, scrape the dough into the lightly buttered bowl and cover with cling wrap.
- Set it on the counter for 1-2 hours or until it doubles in size. Then, gently (so as not to deflate the rise thus far) place it in the fridge to chill for at least 2 hours. 24 hours is best if you have the time.
- At least an hour before taking the dough out of the refrigerator, bring the butter for the filling to room temperature. To prep the rest of the filling, mix the brown sugar, cinnamon, nutmeg, kosher salt in a bowl. Make sure to press out as many clumps of brown sugar as possible, so the filling is relatively sandy and uniform. Next, prepare a 9in x 13in (23cm x 33cm) baking pan by lightly buttering it or spraying it with non-stick spray. You can also add a layer of parchment down if you want extra non-stick action. The parchment will stick to the butter or spray and keep its shape, once in the pan.
- When ready, scrape the chilled/cold-proofed dough onto a generously floured counter and roll it to a 14in x 18in (36cm x 46cm) rectangle, about ¼in (.6cm) thick. Orient the rectangle so left to right is the long measurement (length) and front to back is the short one (width). Spread the room temperature butter across the dough leaving only a ½in (1.3cm) strip along the back length of the rectangle. Then, sprinkle the sugar and spice mixture over the butter as uniformly as you can.
- Once the filling is completed, take the edges of the front length of the rectangle and begin rolling from the outside edges in with gentle tucking motions. The key is to gently pick up small sections, turn, and place them down as if you are pushing the dough over itself. Keep tucking along the length, as you go, until all of the rectangle is rolled up into one cinnamon roll log.
- From there, use a ruler to gently score or indent 1½in (3.8cm) segments in the 18in (46cm) log. There should be 12 rolls sectioned off in total. Cut a piece of thin twine or floss or take out a serrated knife and cut along each indentation. For the thread method, slide the thread underneath the log as close to the counter as possible until it is centered under one of your marks. Bring the thread up and then cross the strands over each other bringing each side to the opposite hand it started in. Next, pull tight and the thread will cut right through the roll and come out clean. As each roll is cut, place it into the prepared pan in a 3 x 4 row/column situation.
- Cover and rest your rolls on the counter top for 30-45 minutes for a second proof. They will puff up to the point of touching. While the cinnamon rolls proof, turn on your oven and preheat it to 375°F (190°C).
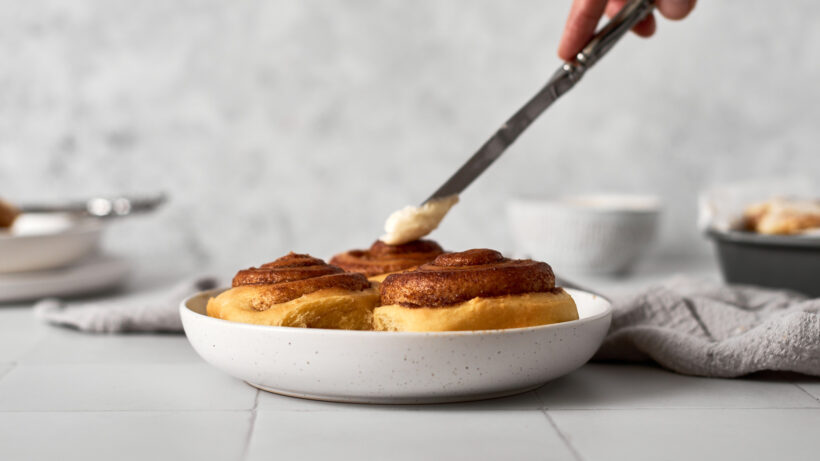
- Next, uncover and bake your brioche cinnamon rolls for 22-28 minutes. While they are in the oven, make the frosting. With a stand or hand-mixer, whip the cream cheese and mascarpone until they lighten in color considerably. Add in the salt, lemon zest, orange blossom water, and vanilla and whip for another 30 seconds before fully incorporating the powdered sugar (icing sugar) a spoonful at a time. When mixed, set the frosting aside until it's ready to use.
- After 22 minutes, take your rolls out of the oven and check their doneness with a probe thermometer. The internal reading should be between 180-190°F (82-88°C). If you have hit this number and the centers of the cinnamon rolls don’t squish down easily when you tap them (especially the middle rolls) then they are done. If not, return them to the oven for another 3-5 minutes.
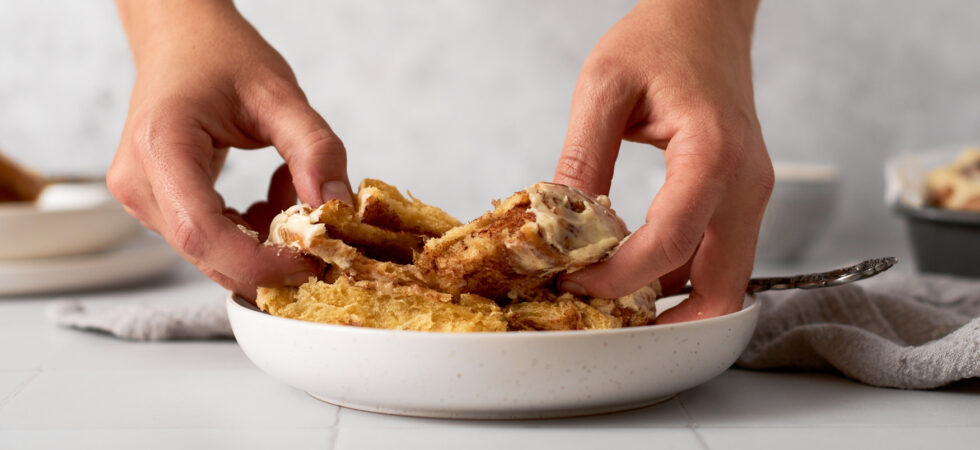
- Once out of the oven, spread the frosting over the rolls and let it melt into all of the nooks and crannies. Rest everything for 5-10 minutes before serving.
Notes
- If you have any brioche cinnamon rolls that are smaller than the others, put them in the center since they’ll take less time to bake through. This way they are more likely to be done at the same time as the ones on the outside.
- If you forget to take the eggs out of the fridge before making the dough, you can add them to a large bowl of tepid water to warm up quickly.
- To soften butter quickly, fill a glass jar with tap-hot water for a minute, pour it out, and then place the empty glass over the butter. The air temperature in the glass will help soften the butter without melting it. You can also, cut your butter into 1tbsp (14g) pats and arrange them on a plate with little overlap so they soften faster. More surface area, means faster heat transfer between the butter and the ambient air around it.
- I recommend moving any uneaten cinnamon rolls to a baking sheet and freezing them individually as soon as possible. Brioche tends to go stale and dry out very quickly. Once frozen, you can toss them in a baggy and into your freezer for roughly a month. Reheat on the lowest power your microwave has in 15 second increments.
Nutrition
Frequently Asked Questions
Most hot water heaters are set to 120°F or 49°C. Turn your tap to hot and use your finger to test both the water and the milk/honey mixture on the stove. If you heat the milk gently enough, you should be able to tell when it hits the same temperature as your hot tap water.
TIP: Warm the mixing bowl ahead of time by filling it with tap-hot water. Then pour it out before adding the milk and honey. This way there’s less of a swing in temperature.
If this is a little too much guesswork for you, use hot-tap water instead of milk. Just, make sure to pre-warm your mixing bowl. The honey is going to bring the water temperature down and you’ll need it warm enough to bloom the yeast.
When working with yeasted dough anything that is cold will inhibit fermentation and rise. It’s okay to use cold eggs and just softened butter. But it will take longer to incorporate into the dough and then rise during the first proof.
Salt can also inhibit rise. So, I like to make sure it’s added after the yeast is bloomed. That way I know it’s live.
Some recipes use bread flour, but I like the softness of all purpose flour in this and most other brioche applications. If you’d like to use bread flour you will need to increase your liquid (milk) by 1/4-1/2 cup (60-120ml).
There are also a number of recipes that don’t use any liquid other than the eggs. To me, hydrating the flour with milk ensures a softer crumb. Fair warning, it does make this dough a bit harder to work with, but IMO it’s totally worth it.
Lastly, I’ve seen some recipes out there that use a poolish at the beginning or just add everything but the butter or flour together at once. I’ve found this recipe’s way of adding ingredients works well for me for most yeasted doughs.
A poolish is a 100% hydration preferment that uses equal parts flour and water, by weight, with the necessary yeast for the recipe. It is vigorously whisked into a froth and then left to rest so the yeast can bloom and looks a lot like pancake batter. A poolish is also typically made with cold water to slow down fermentation and develop more flavor in the bread. Using a poolish is most common in pizza doughs and baguettes.
What is the difference between a poolish and a sourdough preferment? A sourdough preferment uses naturally occuring yeast, while a poolish uses commercial yeast.
Cold-proofing the dough inhibits fermentation and allows the dough to develop more flavor and structure as it rises. Cold-proofing also makes it much easier to not over-proof your dough. The longer the cold-proof lasts, the more “bready” the cinnamon rolls with taste. A full 24 hours isn’t necessary, but the dough is much better after a little sleep over in your fridge for the night.
If you forget the dough in the fridge, don’t worry. This dough can be cold-proofed for up to 2 days if you can’t get to it, but about 24 hours is recommended.
Chilling the dough also hardens the incorporated butter so that it’s much easier to handle at the beginning of flouring and rolling out the dough.
YEP! As described in the instructions, roll from the outside edges in with gentle tucking motions. The key is to gently pick up small sections, turn, and place them down as if you are folding the dough over itself. Keep tucking along the length, as you go, until all of the rectangle is rolled up into one cinnamon roll log.
Don’t roll your hands along the top of the dough log like you are rolling playdough. Pushing the dough like this will not make the roll tight enough. Inversely, don’t stretch the dough tight as you tuck. This is not like making ravioli or pierogi, where you are stuffing filling into a pocket. If you tuck too aggressively, the middle of the rolls will be too tight and bake upwards into cones because they won’t have space to expand outward.
Cut them with thread after rolling the dough rectangle into a log: This is my prefered method. I use jewelry twine. It’s thinner than regular kitchen twine and stronger than floss. Fishing line would also work! This method is my prefered, because I don’t trust myself to keep straight lines with a pizza cutter or knife before rolling.
Cut strips from the prepared rectangle and individually roll them: A lot of chefs prefer this method because you can get perfect looking, uniform spirals. I am just not adept enough at measuring and slicing straight lines. Also, rolling a 1 1/2in (3.8cm) thin strip into a 2 1/2in (6.4cm) round without it falling over or unraveling in some way sounds like an anxiety ridden Squid Game challenge to me.
Cut them with a serrated knife after rolling the dough rectangle into a log: While you can do this, I recommend against it. Mainly because, you’ll end up squishing the rolled dough no matter how gentle you are. If you decide to use this method, a serrated knife will cut better than a flat one.
All of this being said, the main focus is to cut all 12 rolls roughly the same size, so they finish baking at the same time. It doesn’t really matter how they look or if they are a little squished. The rolls are going to proof and expand a second time and then get even bigger when baking and they are going to taste good regardless of the tools used to cut them. So, take a breath and throw your effs out the window.
Absolutely! If you want some ginormous cinnamon rolls use a 9in x9in (23cm x 23cm) pan and cut out 9, 2in (5cm) pieces.
You can also use, 8 1/2in x 4in (21.5cm x 10cm) loaf pans using 3 rolls in each pan and adjusting the number of pans and slice size by how many rolls you want to bake.
Keep in mind, if you want to make 9 jumbo brioche cinnamon rolls, you will need to bake them a little longer. Think closer to 30-35 minutes in the square pan. If you are using a loaf pan it may be closer to 20-25 minutes, as the recipe suggests, since it’s only one row of cinnamon rolls. You can use a thermometer, tester, or press the centers gently to check for doneness.
Okay, time for my hot take. I am not a gooey center cinnamon roll girl. Undercooking doughs to the point of not seeing any bread structure when you pull it apart is both scary and texturally unpleasant to me.
If you want to have that gooey-textured center feel free to bake according to the numbers in the question header. Or, you can also try pouring 1/4-1/2c (60-120ml) warmed (not hot) heavy cream over the rolls about 5 minutes before baking. This way, you have added moisture for the gooey center, but are still cooking the rolls to the correct internal temperature. I believe these brioche cinnamon rolls as they are, are soft and perfect. But I get it and now you know!
Aside from the description in the instructions, you can also insert a toothpick between two rolls but towards the center of one. If you pull it out and the toothpick is covered in raw dough, you know it’s not finished baking. Return the brioche cinnamon rolls to the oven for another 3-5 minutes. If pieces of dough come out with the toothpick but you can see they have texture, don’t put the rolls back in. Carry over cooking will take care of the rest. This is my prefered doneness. A clean toothpick, means they are definitely done and should be taken out.
This is a simple one. Replace the mascarpone cheese with cream cheese, up the vanilla by 1/2tsp (2.5ml), and use the zest of half a lemon. Done!
I recommend moving any uneaten cinnamon rolls to a baking sheet and freezing them individually as soon as possible. Brioche tends to go stale and dry out very quickly. Once frozen, you can toss them in a baggy and into your freezer for roughly a month. Reheat on the lowest power your microwave has in 15 second increments.
OH YEAH! Right after you slice the rolls, lay them individually on a baking sheet and place them in the freezer. Make sure when you do go to bake them, you let them not only defrost but also sit, covered, for their second proof. This will take 3-5 hours on a countertop depending on the temperature in your kitchen. They are ready to bake as soon as they double in size.


So yummy. While mine may never look super pretty, nobody has complained about the taste, my niece said they were better than Cinnabon( trust me impressing teenagers is hard) I did add the 1/4 c of cream right before baking as mentioned in your suggestions cause we like the gooey centers.
Wow! Teenager approval. I’m honored. 🙂
Thank you for this recipe. I have been looking for a recipe that used all-purpose flour, instead of bread flour for some time. This will make morning baking that much simpler.
You are so welcome! I’m glad I could provide the recipe you were searching for!
My husband made these not once, but TWICE and both times they were an absolute success. Best cinnamon rolls we’ve ever had, hands down!
This made my year! Thank you so much for the comment. I’m so glad you like the recipe. 😀