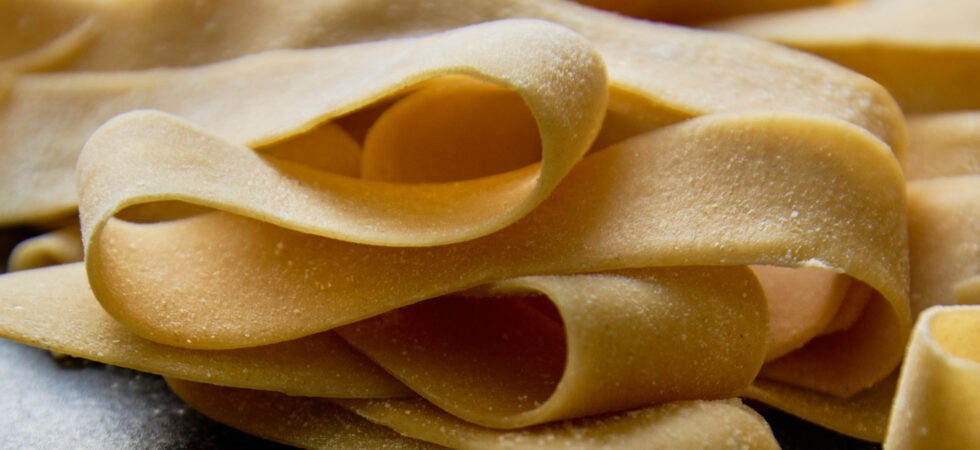
Pappardelle Pasta

This pappardelle pasta recipe is made from an all-purpose, flat noodle pasta recipe that makes perfect egg pasta every time. It’s consistent because of weighted measurements. It doesn’t waste flour like the recipes that go by feel might. And it’s simple. All good things in my book.
Now, If you want to learn pasta making by feel or want to know why the more common 100g of flour per 1 egg pasta recipes doesn’t always work, I have extra info for you in the FAQs. And, if you are just starting out on your pasta journey and want to immediately have a good pasta making experience, this is the place to start.
Quick backstory, because credit should be given where credit is due: This recipe came from a Reddit post called, “Ditch the “1 egg = 100g flour” rule for making pasta” written by lady_MoundMaker. I’d made pasta several times over the years, to go with my Braised Beef Ragù recipe, using the 1 egg per 100g or 1 cup of flour (which is even more by weight, even if measured after aerating, typically between 125g-140g). Sometimes my pasta dough was perfect and soft and other times it was tough and took every ounce of my strength to knead. So, I went a researching and found this post. I have never looked back.
Get the Recipe: Pappardelle Pasta
Ingredients
- 2 large eggs, (50-60g each)
- 1¼-1½ cups 00 flour, (see instructions for exact amount of flour)
Equipment
- 1 kitchen scale (required)
- 2 small bowls
- cling wrap/film
- 1 pasta sheeter or pasta attachment
- 1 Rolling Pin (optional, substitiute to a machine – see FAQs)
- 1 cutting board
- 1 chef knife
Instructions
- First, place a small bowl on a kitchen scale and tare it to 0g. Next, crack 2 eggs into the bowl and weigh the eggs. Multiply the total weight of the eggs, by 1.64 to get the amount of flour needed to make your pasta dough.
- Now that you have your ingredient measurements, weigh out your flour and pour it onto a clean working surface. Flatten the mound and create a well (bowl) in the center of the pile. Into that divot, add your eggs from the small bowl. Use a fork to stir the eggs and slowly incorporate flour into them. Be careful not to collapse the flour well’s wall as you move your fork around the circle. Things can get messy if the eggs are allowed to run out of the center before enough flour is mixed into them.
- Once your egg mixture has thickened enough to stay put, you can begin moving all of the flour from the sides of your well into the center. When a dough begins to form, you can get your hands involved. Cover them with some of the flour on your workspace, to help with sticking. Then begin kneading the dough. Press the heel of your hand into the dough pushing it forward and indenting it. Then turn the dough a quarter turn clockwise or counter clockwise and press down again. As the dough starts to better incorporate, make sure to roll it into any stray flour until all of it is fully mixed. Any flour on your hands will also end up worked into the dough.
- Continue kneading the dough until it is uniform and smooth. (typically between 5-10 minutes) When the dough is ready to rest, it should have enough gluten development that it has some spring back. To test, press a finger into the dough with the same amount of pressure you would use to press an elevator button. (We aren’t smashing those down right?) The dough should indent and then fill back in about half way over a second or two. If the dough stays fully depressed, keep kneading.
- Once the dough is ready, wrap it in cling wrap and place it in your refrigerator for 30-60 minutes. After resting, remove the dough from the refrigerator and cut it into 3-4 equal pieces. Make sure to cover the pieces you aren’t currently rolling out and cutting, so they don’t dry out.
- Attach a pasta attachment to your stand mixer or affix your dough sheeter to your counter top to roll out the dough. (See FAQs for instructions on how to make dough sheets without a pasta maker.) Keep plenty of flour, semolina and 00, out and ready to use while forming the pasta sheets. Lightly flour your work surface and use your hands or a rolling pin to flatten the pasta dough into a rough square about ½ in (1.3cm) thick. (Throughout the whole rolling process, if the dough starts to feel a little wet, sprinkle it and/or the machine with more flour.)
- Next, set your pasta roller to the widest setting (see notes for KitchenAid settings). Typically pasta machines use the numbers 0 or 1-8, with the lowest number being the widest and the higher numbers being the thinnest. Turn on the machine to a low speed and feed the pasta dough square through the machine. Keep the machine at the widest setting and fold the dough in half or into thirds (like folding paper for an envelope). Then, re-feed it through roller. If it's in half, make sure to feed it folded side first. (This way, the two ends don’t move separately into the machine.) Repeat this fold and feed step 2-3 times. You should end up with a well-worked dough that reaches both sides of the chute, and has a relatively squared off shape.
- Move onto the second widest setting, simply running the pasta sheet through once without folding. Then, move to the third, fourth, and fifth widest settings, sending the pasta dough through the chute each time. (The pasta sheet should get thinner and longer each time you go to the next setting.) If you’d like to send the pasta sheet through more than once at each setting, to be sure of the shape and thickness, feel free to do so.
- For pappardelle pasta, work your way down to either the second or third to last, thickness setting. This pasta is meant to be slightly thicker than some of the more delicate styles. Once the dough piece is fully rolled out, give it a good coating of semolina flour on both sides, lay it flat, and let it dry a bit.
- Repeat the process on the remaining pieces of dough, laying them out as well. After 10 minutes, return to the first piece. If needed, cut the sheet in half, so you have two sheets of equal length. Pappardelle is usually between 14-16in (35.5-38cm) long, but you can cut the length to anything you want. Then, fold the end of a sheet about 2 inches over itself. Continue rolling in 2 inch increments until you have an oblong roll of pasta. Then, use a knife to cut ¾-1in (2-2.5cm) wide strips of pappardelle pasta. Unroll the strips. Do the same rolling and cutting for the rest of the rolled pasta sheets, until you've finshed cutting them all. Then, either cook or save your pasta for another meal. (see FAQs for cooking and storage instructions.)
Notes
- This dough can be used for all types of pasta with long, flat noodles, e.g. fettuccine, tagliatelle, and/or linguine.
- Once you get the hang of what pasta dough should feel like, feel free to crack as many eggs as you’d like into 80-100 flour per large egg and go by feel. On the low end, you will most likely need to add more flour and on the high end you probably won’t use it all. Have fun!
- My KitchenAid settings go from a 1 to an 8. I prefer to stop rolling this pasta out at either a 5 or a 6 setting.
- I don’t salt my pasta dough. I salt the water. (see FAQs for why)
- If you really want your pasta dough pieces be the same, weigh the dough ball and divide by how many pieces you’d like to work with.
- The smaller the pieces the shorter the sheets of pasta.
- Instead of adding water to drier pasta (too much flour), consider adding an extra yolk for a richer pasta. (See FAQs)
Nutrition
Frequently Asked Questions
Okay, the most important thing to know about this super common recipe, is that it requires eggs that weigh exactly 60 grams. Something, almost never specified in recipes. You are literally getting half of the equation!
I buy large eggs at the store and rarely get 60g eggs. In fact, I do A LOT of weighing for recipe development, and most of my U.S. “large” eggs are between 50-55g. To make matters worse, egg catergorization to weight isn’t standardized and varies slightly country to country.
So, now that you don’t have exactly 60g eggs, in come all of the “by feel” adjustments. If you aren’t ready for that, what is supposed to be a simple recipe, can cause a whole lot of frustrations. Believe me, I’ve been there!
If you do want to stick to this pasta recipe, I would say to use the largest eggs in your carton and hope for the best. Or, add extra whisked egg yolk, to make up for whatever amount you are missing. Now you know! Good Luck!
To make pasta by feel (no weighing or formulas), start with about 1½ cups of 00 flour and 2 eggs. Scoop the flour correctly, so it’s not too compact. Scoop with one measuring cup and pour the flour from your scoop cup into the measuring cup you plan to use. Once gently filled, level the flour and pour it onto your counter or a clean work surface.
Next, make a well and crack the eggs into the center of the well. Mix the eggs, with a fork, into the flour. Be careful not to collapse the flour well’s wall as you move your fork around the circle. When the egg/flour mixture is thick enough, incorporate some (not all) of the flour into the dough. Keep adding flour and kneading until the pasta dough is the consistency of slightly old playdough.
This will take a bit more time than the above pasta recipe, because flour takes time to hydrate and you aren’t adding it all at once. Without an exact ratio, you won’t know if you need all of the flour on your work-surface, so it’s best to knead to almost uniform and then add more flour until the dough isn’t sticky. (If you add too much flour, no amount of kneading or resting will save your dough from being tough. Read the next FAQ for fixing tough dough.)
From there, wrap your homemade pasta dough and use the instructions above to rest and roll it into pappardelle noodles.
So you ended up adding too much flour by accident or the dough just feels tough. What do you do?
You have two options to amend dry pasta dough.
1. Add water: This is really the easiest option. Water is easy to measure at any amount. You will need less. And, It’s also easier to incorporate than egg, because it’s so thin and doesn’t have any stubborn protein or fats to mix in. Water is the universal solvant after all.
2. Add egg yolk: Even though water is easier, egg yolk is better. Why? Because of those fats and proteins. It end up softer because of the fat, but also less sticky (more structure) because of the added protein. The more egg yolks you use the richer the pasta dough will be.
When adding either option, use a little at a time. Think ½ tablespoon (7.5ml) of water or 1 tablespoon (15ml by volume) of egg yolk. If you decide to add egg yolk, it’s best to whisk the yolk and then pour.
Salt denatures the proteins in eggs and inhibits gluten development in dough. Which means, the dough will need more kneading to reach the proper consistency. And there’s no reason for the extra kneading when pasta dough is so thin. Cooking it in salted water will inbue it with plenty of salt, even with the shorter cooking time.
Speaking of, adding salt to dough leaves granulated crystals in the dough that only dissolve into the surrounding cells when it is added to boiling water. This is a much less uniform flavoring than adding pasta to water that has already dissolved salt in it.
Does this mean you can’t do it? No. It just means it’s easier to make unsalted pasta and cook it in salted water.
Of course, you can substitute all-purpose flour for 00 flour. Use the same ratio and weigh everything with a kitchen scale.
For context, 00 flour is milled from soft wheat and has a protein percentage between 9-11%. Essentially, this is low enough to keep the pasta tender and high enough to also give the pasta structure. Most all-purpose flours are milled from hard wheat and are typically higher in protein. This means they produce chewier pasta, even substituted in a 1:1 ratio. King Arthur brand AP flour sits at 11.7%, while Gold Medal flour uses a mix of hard and soft wheats with a protein percentage of 10.7%. The only AP Flour that I know of that uses only soft wheat is White Lily, which has a protein content of 9%. White Lily is the closest substitution to 00 flour, and your best option, followed by Gold Metal.
Also, yes! Semolina is also milled from durum wheat. However, it has a larger grain size than 00 flour. This leads to a more structured pasta. 50% – 100% Semolina flour pasta dough is best for shaped pasta dough or sometimes ravioli. I know ravioli seems counter intutitive, but because two sheets of pasta are layered, but ravioli pasta sheets need to be thinner. And semolina gives the dough more structure so it can be thinner without ripping.
Resting the pasta dough allows the gluten in the pasta dough to relax. Kneading works the gluten structure into tight coils and creates a lot of springback. Time lets those coils release. This makes rested dough easier to roll out. If you find the dough is shrinking at all after is passes through the machine, let it rest (covered) for 10 minutes and start over.
Resting the dough also allows the flour to full hydrate for a smoother, better textured result.
If you don’t have a pasta maker or attachment, use a regular rolling pin. Pasta dough is petty sturdy once it rests. With a fair amount of flour covering the kitchen counter, the pasta’s surface, and your rolling pin, your pasta should not stick.
Cut the pasta dough into at least 6 pieces before rolling them out. The smaller the pieces, the easier it will be to achieve thin dough quickly. Make sure to fold and roll out the dough a few times before focusing on creating a thin sheet of pasta.
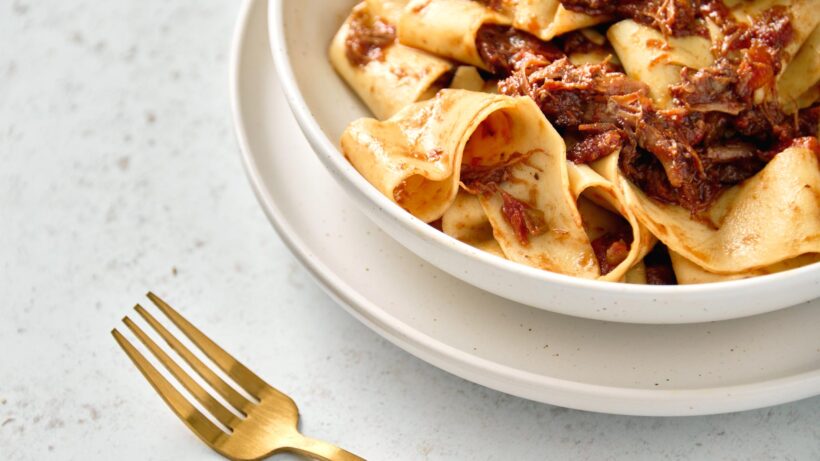
If you plan to cook the fresh pappardelle pasta right away you’ll need to make sure you have a sauce ready before you cook the pasta. Fresh pasta cooks really fast and is much more delicate than dried pasta from the store. While pasta from scratch is infinitely better (IMO), things happen quickly and you have like 60-90 seconds to toss pasta in sauce and get it coated before it fully cooks and moves into over cooked territory.
Instructions:
Begin by filling a medium pot with 8 cups of water and 1½ teaspoons of kosher salt. Bring the water to a boil, then get the sauce ready. The sauce should be in a sauté pan and simmering (medium-low heat) by the time your pasta goes into the boiling water. Cook the pappardelle pasta in boiling water for 1-2 minutes (depending on the thickness you chose).
The pasta should be al dente (to the teeth) when finished boiling. Essentially, the pasta is 90% cooked through. There should be just a little chew in the very center of the noodle. Add the pasta into the heated sauce. Rock the pan downward to shift the noodles away from you and flick your wrist back to toss them back towards the center of the pan. Or use tongs to coat the noodles and finish the cooking process.
Of Note: Add a little bit of skimmed off pasta water to the sauce and noodles while finishing them. It will thicken and further emulsify the sauce, due to the starch.
It’s best to store homemade pasta in one of two ways
1. Fully dehydrated: Use a dehydrator or a drying rack to full dry out the pappardelle pasta. It should take between 12 and 24 hours. When the pasta is fully dry, place it in an airtight container for up to 6 months.
2. Frozen: This is my preferred method of storage because letting dough made with eggs sit for an extended period of time makes me nervous. It is important to make sure the pasta has dried out a tad, but is still malleable, before making nests of the dough. This ensures the dough doesn’t stick to itself while it sits. Once the nests are made, place them on a silicone or parchment-lined baking sheet. Make sure the nests do not touch each other. Then, place the tray in the freezer. Once they are fully frozen, put the bundles in a plastic or silicone storage bag. Keep the pasta in the freezer for up to 1 month.
Yes. But do not store fresh pasta for longer than 24 hours. It will turn a greyish color and the flavor will go off.

There may be affiliate links in this post. A Little Spoon, LLC is a participant in affiliate advertising programs designed to help content creators earn fees by linking to affiliated sites.