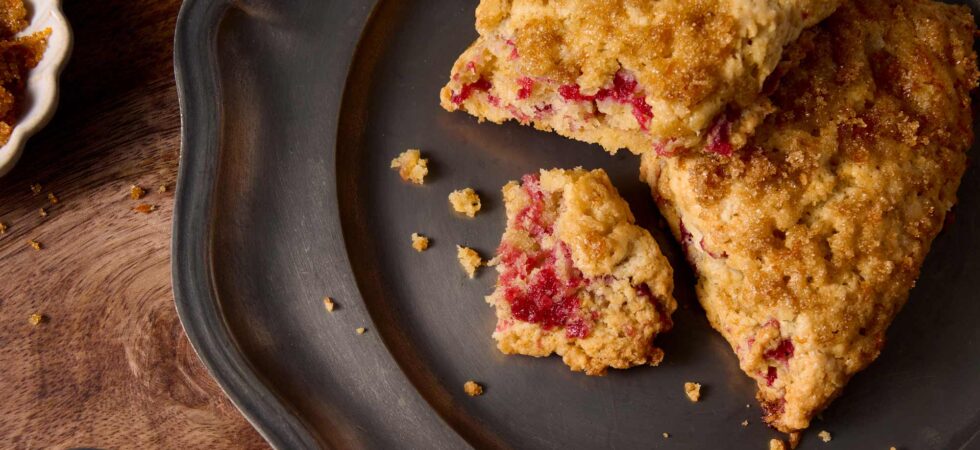
Cranberry and Orange Scones
These Cranberry and Orange Scones are my absolute favorite scones for 2 reasons:
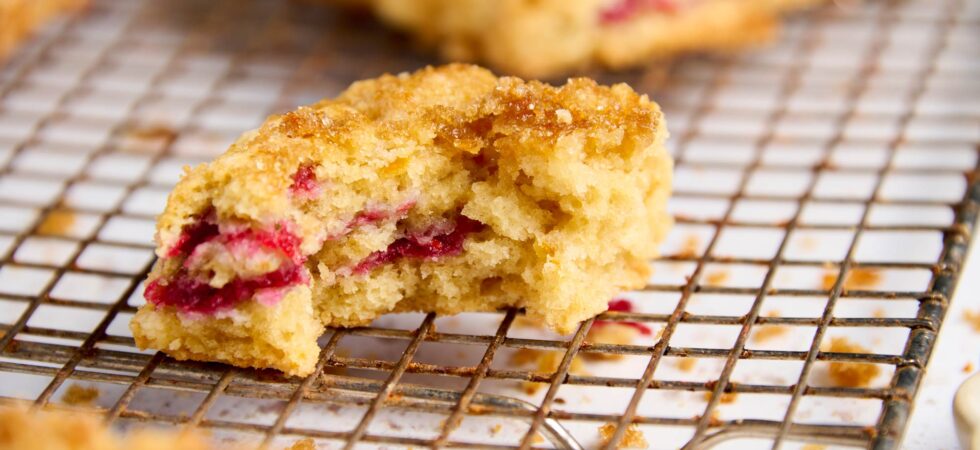
1. Texture: They are super tender, yet sturdy enough to still feel like a proper scone. I played around with different flours, leavener ratios, liquids to come up with my perfect version. And then, I kept the texture intact by not adding in whole or dried fruit. What can I say, jam was just the absolute right choice!
2. Flavor: Cranberry and Orange is my favorite flavor combo in baked goods, especially around the holidays. The sweetness in the orange-sugar topping, subtle orange scone dough, and layers of cranberry-orange jam really make this recipe sing at every level. If you are wondering, yes, I do buy bags of cranberries in November and December and freeze them, so I can make cranberry and orange scones year-round.
Get the Recipe: Cranberry and Orange Scones
Ingredients
Orange-Sugar Topping
- 1 tablespoon orange zest, approx. 1 medium orange
- ¼ cup brown sugar, dark or light
Cranberry-Orange Jam
- ¾ cup cranberries
- ¼ cup orange supremes or wedges, approx. 1 medium orange
- ½ cup refined, granulated sugar, (See Notes)
Cranberry and Orange Scones
- 1 tablespoon orange zest, approx. 1 medium orange
- ⅓ cup brown sugar, packed
- ½ cup unsalted butter, very cold
- ⅔ cup heavy whipping (double) cream, plus extra for brushing the scones
- 1 tablespoon sour cream
- 1 large egg, (approx. 50-55g)
- 1 tablespoon Orange Juice
- 2¼ cup "00" flour, plus extra for shaping the scones
- 2 tablespoons powdered milk
- 2½ teaspoons aluminum free, double acting baking powder, See Notes
- ½ teaspoon baking soda (bicarbonate of soda)
- ½ teaspoon Diamond Crystal kosher salt
Equipment
- 1 Small Sauce Pot
- 1 spatula
- 1 Microplane or citrus zester
- 1 paring knife
- 1 food processor or pastry cutter optional
- 1 bench scraper optional
- 1 ruler minimum of 12in (30.5cm) and preferably metal
- 1 baking sheet lined with parchment paper or a silicone mat
- 1 pastry brush
Instructions
Orange-Sugar Topping
- First, add the brown sugar to a small bowl and then zest and orange over top. Take your fingers and rub the zest into the sugar until you get a uniform mixture. It will moisten a bit as you rub, that’s supposed to happen. Set the bowl aside to continue infusing.
Cranberry-Orange Jam
- Next, add the cranberries and sugar to a small pot on your stove top. Then, take the zested orange and cut away the peel to make supremes. To do this cut off the top and bottom of the orange to make a flat/stable surface for cutting and easy access to the meat of the orange. Now, slide your knife from top to bottom, curving with the fruit, in between the orange flesh and the white pith. Once you’ve fully cut away the peel, use your knife to cut out a wedge of fruit (or supreme) from in between the white-lines membranes. Repeat the process until you have all the orange slices you need. (See Notes for short cut) Add them to the pot and turn on the burner to medium heat.
- The cranberries will start to pop, and the mixture will turn liquid after a few minutes. Once everything has broken down, start constantly stirring the sauce and bring the temperature up. (see Notes for a smooth jam option) This can take anywhere from 7-15 minutes depending on the heat and how wide the base of your pot is. Cook the jam until it reaches 220°F (104°C) and starts to pull away from the sides of the pot like a caramel.
- Remove it from the stovetop and do a quick cold test by dropping a small bit of jam onto an ice-cold counter (place an ice pack down a few minutes before the test) or a freezer-cold plate. If the jam is malleable/spreadable without being runny it’s good to bake with. Scrape up as much jam from the sides of the pot and into its center as you can while it’s still warm. Then, set it aside to cool.
Cranberry and Orange Scones
- It’s time to move onto assembling the scones. Cut up your fridge-cold butter into .5in (1.3cm) cubes and place them in the freezer to chill. Then, add brown sugar and the zest from a second orange to a separate small bowl and repeat the same rubbing process as was used for the topping. Set the bowl aside while you prep the other ingredients.
- Now, pour the cream into a medium bowl and, one at a time, whisk in the sour cream, egg, and (lastly) orange juice until each are fully incorporated. Set your wet ingredients aside.
- Begin the dry ingredients by pulsing the flour, baking powder, baking soda, powdered milk, and salt in a food processor 3-4 times. Add in the orange-rubbed sugar and pulse again. Then, take the butter out of the freezer and add it to the food processor. Pulse the flour mix (another 3-4 times) until small pea-sized pieces of butter form.
- Once that’s done, dump the flour/butter mixture into a large bowl and pour about half of the cream mixture into the bowl. Use a spatula or spoon to gently fold and stir the dry ingredients and cream mixture until it begins to incorporate into a rough dough. Add in the rest of the cream mixture. Once most of the stray flour is mixed in, abandon the spatula/spoon, pour the bowl’s contents onto your counter, and use your hands to finish mixing. Your warm hands, will begin to melt the butter if you work the dough for too long, so be gentle and quick. A bench scraper can be really handy here.
- Now, shape the scone dough into a rough square and use the bench scraper or a knife to cut it into quarters. Shape each square into a circle roughly 10 in (25.4 cm) in diameter (it's okay if they are a little small) and flour the work surface and the dough if they start to stick. Top three of the dough circles with cranberry-orange jam. Spread it all of the way to the edges as evenly as you can. Then, stack the layers. Save the only piece without jam for the top layer. Once stacked, if needed, gently press and re-shape the stack until it is roughly 10 in (25.4 cm) in diameter and 1½in (3.8 cm) tall.
- Using the sides of the ruler or a knife edge, slightly indent the top of the scone dough to give you guidelines for cutting. First, cut the dough round in half, then quarters, and then cut each quarter in half for 8 equal wedges.
- Place each wedge onto a silicone or parchment lined baking sheet roughly 2in (5 cm) apart. Then, brush the top of the scones with some cream and sprinkle them with the sugar topping. Rest the dough in the fridge for at least 20 minutes.
- While the dough chills, preheat your oven to 425°F (218°C). When ready, Bake the scones 5 minutes and then turn down the oven to 400°F (204°C) for another 12-15 minutes. Let the cranberry and orange scones cool for 5-10 minutes before eating and until fully cooled before storing.
Notes
- Rubbing the zest into the sugar releases orange oil which creates a more fragrant and flavorful scone.
- Refined sugar has no molasses in it, which translates to jam with a brighter, more pronounced flavor. If you want a subtle or pronounced caramelized flavor, feel free to use anything between unrefined and brown sugar in the jam.
- If you want to skip making orange supremes, get the easy-peel mandarin oranges and peel them very well or just use 50g (about 1/4 cup) fresh squeezed orange juice.
- For a super smooth jam, put everything in a blender just before you would turn up the heat. Blend and strain the sauce, through a fine mesh strainer, back into the sauce pot. Then, cook according to instructions. The jam will also be brighter and more vibrant in color.
- Baking powder with aluminum causes a chemical reaction with the citrus in the jam that will turn the crumb touching the jam an almost bluish color. It doesn’t hurt anything, but visually things will be better with an aluminum free baking powder like Rumford Baking Powder.
- If you cannot bake the scones between 20-60 minutes after making the dough, you should freeze the scones and bake them from frozen. (See FAQ)
- Baked scones will only last 3-4 days at room temperature before they dry out, however, you can keep them in the freezer and reheat in the oven or microwave (on low) for about 1 month.
Nutrition

Frequently Asked Questions
I use 00 Flour specifically with baked goods that I want to have a tender crumb for 3 reasons:
1. Soft Wheat: Most all-purpose (AP) flours are milled from hard (red) wheat while 00 flour is usually milled from soft (durum) wheat. Durum wheat has great structure but less elasticity than their red wheat counterparts (all-purpose and bread flours). Simply put, doughs with 00 flour in them are less chewy, making them ideal for the softer and lighter textured baked goods.
The only AP flour brand I know of that uses soft wheat is White Lily. (Yes, of course, I tested these scones out with White Lily all-purpose flour.) The flavor was still on point; however, they were a little more cake-like than I wanted and fell apart very easily. For a reference, to those in the USA, I would liken the texture to a drop biscuit.
So, why the difference if 00 flours and White Lily AP Flour are both soft wheats? Let’s continue…
3. Protein Content: The protein content in most 00 flours is between 10-11%, while White Lily AP flour’s protein content is 9%. This means two things happened during the White Lily test. 1.) There was just not enough protein/gluten to give me the stronger structure I wanted and 2.) I needed to use about 1/3c (35-40g) more flour for the same level of hydration. Speaking of hydration…
2. Grain Size: 00 refers to how finely ground the flour is which ranges from 00 to 2. 00 flour is the finest level of ground flour. Finer milling means the dough needs less water for hydration. A wetter dough softens the gluten and allows for better gelatinization between the water and starches in the flour. It also means the formation of larger air pockets and a more open, lighter result with a more stable and less crumbly structure.
As an added bonus, better hydration results more moisture retention after baking. So, these are going to last a day or two longer than AP flour scones, when stored at room temperature.
Of Note: I used both King Arthur 00 Pizza Flour (10.5% protein) and Anna Napoletana Tipo 00 Extra Fine Flour (9-11%) during testing. Both worked beautifully.
You can definitely use all-purpose flour, though you will need to adjust measurements according to your flour’s protein content. Here are guidelines based on protein content:
1. AP Flour with 9% protein will need around 2 1/2 cups of flour (315g)
1. AP Flour with 10.5% protein will need around 2 1/4 cups of flour (280g)
2. AP Flour with 12% protein will need roughly 2 cups (250g)
The texture will be chewier, and they will need to be frozen the same day as baking, to maintain moisture. All in all, however, you will still have a delicious scone.
Let me lead with an emphatic YES!!! Finally, a recipe where too much gluten structure is something we are avoiding.
I tested these with Bob’s Red Mill 1:1 GF Baking Flour and they turned out great. I did need to use more flour than listed above to get the right amount of hydration in the dough. So, for those of you who want to try this, you will need to use 2 1/2c (320g) of 1:1 GF baking flour.
I get it, sometimes you just want a little treat or more to go around. If you want to make more, smaller scones weigh and cut the dough into two equal pieces after mixing. Then, follow the shaping and layering instructions, as written in the recipe, for each piece. The final circles should be 5in (13cm) in diameter and 1in (2.5cm) in height. Bake the scones at 425°F (218°C) for 3 minutes and then turn down the oven to 400°F (204°C) for another 9-12 minutes. The bottoms should just start browning.
I don’t recommend chilling the cranberry and orange scones longer than an hour before you bake them. Chilling is really just to firm up the butter and reduce spread.
Once mixed, the acidic ingredients in the dough will react and neutralize the baking soda and baking powder in the scones. The longer they mingle the less rise you get when baking.
Even with a double-acting baking powder, the rise will be less the longer the dough sits. If you cannot bake the scones within an hour of making the dough, I suggest freezing them and then baking from frozen.
Yes! To freeze them, place the scones on a silicone lined baking sheet. Make sure they aren’t touching. Freeze them for a few hours and then move them to a plastic baggie or lidded container to save space and keep them from drying out. Unbaked, frozen scones will last in your freezer for roughly 2 months before acquiring freezer burn and losing their flavor.
Bake the uncooked, frozen scones at 425°F (218°C) for 5 minutes. Then turn down the oven to 400°F (204°C) and bake for another 14-17 minutes. The bottoms should just start browning.
Yes, to this too! Again, place the scones on a silicone lined baking sheet. Make sure they aren’t touching. Freeze them for a few hours and then move them to a plastic baggie or lidded container to save space and keep them from drying out. The baked scones will stay good for roughly 1 month in the freezer.
To defrost/reheat the scones, take as many as you plan to eat out of the freezer. Either place the scone(s) in the fridge or on the counter to defrost or reheat it on a bread setting in your microwave in 15-second increments. If you don’t have a bread setting, use 10% power. You can also use an oven to reheat the scones. Bake them at a low temperature, under 300°F (149°C), for 5-10 minutes.
If you plan to leave the scones at room temperature, I recommend finishing the scones in 3-4 days. They have enough sugar in them that they will last 5-7 days at room temperature before going bad, but they will dry out well before then. Make sure to store them in a lidded container.
In the refrigerator, they can last 7-10 days before going dry and 2 weeks before going bad.
All baking powders contain baking soda along with a weak acid (like potassium hydrogen tartrate, monocalcium phosphate, or sodium aluminum sulfate) and cornstarch (used as an anti-caking agent).
Baking powder was developed to be a complete leavening agent, so bakers wouldn’t need to rely on mixing things like lemon juice, sour milk, or vinegar with baking soda to create rise in their baked goods. Cream of tartar (potassium hydrogen tartrate) mixed with baking soda allowed for a shelf stable leavening agent that would only activate when mixed with liquids.
From there, the reaction and timing were the same as working with solely baking soda and acidic ingredients. And this single acting baking powder would run its course within 20 minutes of mixing the wet and dry ingredients together.
To allow for more time after mixing dough and batters, scientists developed double acting baking powders using acids like monocalcium phosphate or sodium aluminum sulfate instead of cream of tartar. These modern baking powders produced a second chemical reaction when heat was introduced during baking. Today, most baking powders are double acting.
The aluminum in these baking powders can react with strongly with ingredients that contain anthocyanins (think cranberries, blueberries, garlic, red cabbage, etc.) and turn your baked goods blue or green where the reaction occurs. Not only is there are visual reaction, but your baked goods can also take on a mineral or metallic flavor.
The monocalcium phosphate (specifically the phosphates and phosphorus elements in this ingredient) in aluminum-free baking powders acts as a buffering agent in food products. What does this mean? It helps maintain a stable pH level and prevents undesirable changes in color, taste, and texture.
Is baking powder with aluminum bad? Nope, there’s just a time and place for them.
Check the ingredient label. If you see sodium aluminum sulfate, this is not the baking powder you are looking for (with jedi hand sweep included).


There may be affiliate links in this post. A Little Spoon, LLC is a participant in affiliate advertising programs designed to help content creators earn fees by linking to affiliated sites.