

Salt-Cured Egg Yolks (Soft and Hard)
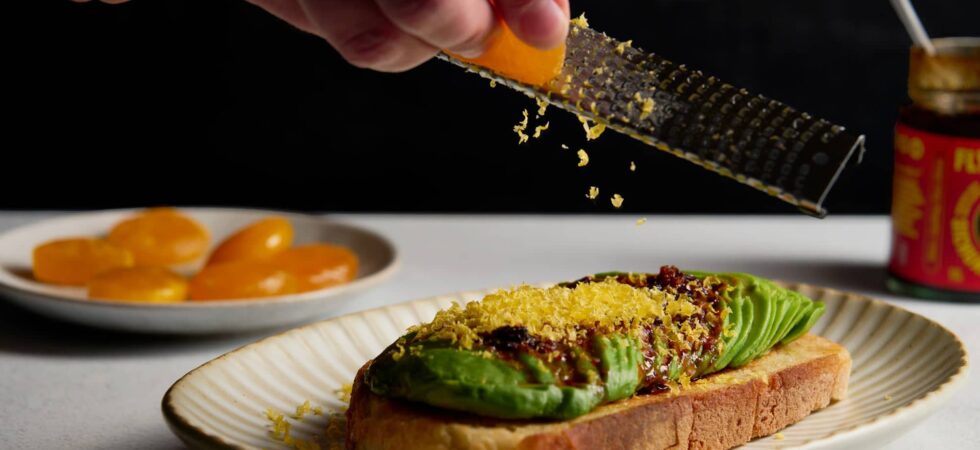
If you want an impressive way to instantly upgrade a dish, salt-cured egg yolks are the way to go. Cured egg yolks are traditionally used in Southeast Asian and Chinese cooking. However, over the last several years, they gained popularity in high-end kitchens all over the world, for very good reason. I too now have a mild obsession with the whole spectrum of soft-cured to hard-cured egg yolks. Because why choose, right? My reasons are simple:
1. The taste is unparalelled. Savory, salty, and rich, a cured egg yolk adds a finishing pop to every dish. It tastes very similar to parmesan cheese grated over pasta. In fact, this is an excellent substitute for my lactose intollerant friends.
2. They are so easy to make. Most of the work is passive and the prep only takes a few minutes. Say less!
3. The recipe is scaleable and variable with little to no effort. Going from 1 to 6 egg yolks just requires a bigger container and more of each ingredient. Plus, changing up the curing times for each yolk gives so many different cooking and finishing options. (see FAQs for cure time results)
4. It takes away the work of figuring out how to use extra yolks: If I plan to make a dish that uses egg whites like Cinnamon Roasted Pecans, Toasted Marshmallow Fluff or Homemade, Ganache-Swirled Marshmallows or I have my sights set on a foamy cocktail like a Grapefruit-Champagne Negroni Sour, it’s nice to have a no brainer recipe waiting in the wings to pull from. I feel like this happens a lot around the holidays!
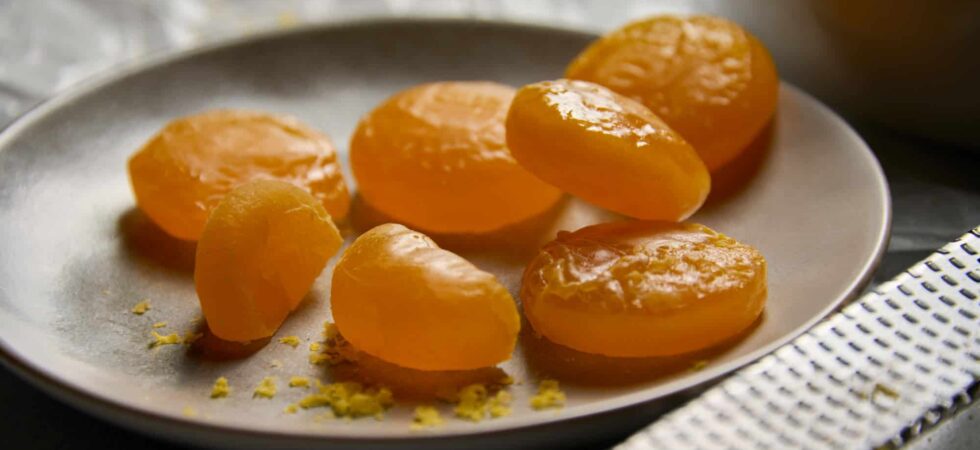
Get the Recipe: Salt-Cured Egg Yolks
Ingredients
- 1 large egg yolk
- 6-8 tablespoons kosher salt or sea salt (ONLY, see notes)
Equipment
- 1 small dish or pinch bowl , something the size of a muffin tin cup
- 1 kitchen scale or measuring cups
- press and seal or cling wrap (cling film) , optional if your dish is lidded
- 1 metal spoon
- 1 cooling rack (for hard cured yolks)
- 1 baking sheet (for hard cured yolks)
- parchment paper (for hard cured yolks)
Instructions
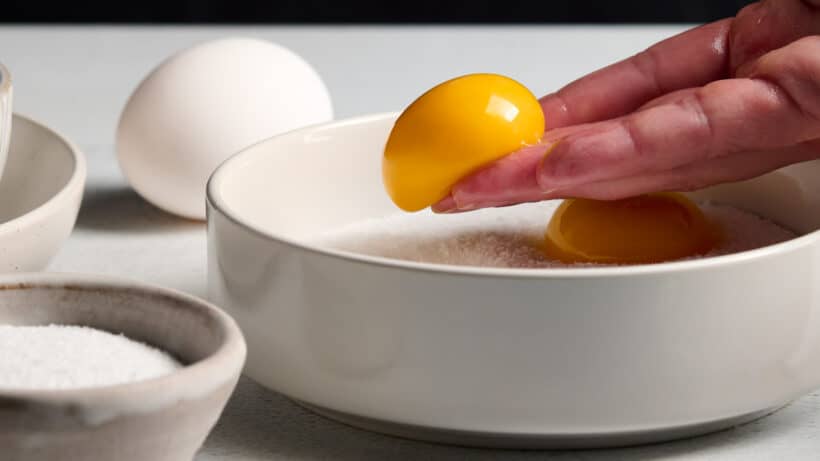
- First, cover the bottom of the dish with a little more than half the salt. The level should be around 1/2in (1.3cm) deep. Next, create a small divot in the salt where the egg yolk will cure. You can use your fingers, a spoon, or my personal favorite the wide end of the egg used in the recipe (The slope of the indentation always comes out better.) Make sure the indentation doesn't hit the bottom of the dish. The egg yolk needs to be covered by the salt on all sides.
- Now, crack the egg and gently separate the yolk from the white (albumen). Place the yolk into the salt indentation. Be careful not to break it open. Pour the rest of the salt over the top of the yolk. If you need a bit more, that's fine. The goal is to completely cover the yolk so no yellow is visible.
- Now that the yolk is prepped, cover the dish and place it in the refrigerator somewhere between 2 hours and 7 days. (2 hours will give you a lose yolk the texture of a thick caramel sauce with a slight salinity. 7 days will create a more rubber-like texture with a very, very salty taste, perfect for grating over dishes as a finishing topping.) (See FAQs for a run down on taste and texture at different curing times: 2hrs, 12hrs, 24hrs, 2 days, 5 days, and 7 days.)
- When the egg has cured for however long you'd like, use a spoon to remove the yolk from the salt. Gently rinse the salt off the surface of the cured egg yolk. If the yolk has more than a 24-hour cure make sure to pat it dry after rinsing. At this point the soft salt-cured egg yolk is done! YAY!
- If the goal is a hard salt-cured yolk, preheat the oven to its lowest temperature setting. This is typically between 150-170℉ (65.5-67.8℃). Next, inset a cooling rack into a baking sheet. Place parchment paper over the top of the cooling rack and place the cured egg yolk on the paper. Put the pan in the oven to cook. (If the oven temperature cannot go down to 150℉ (65.5℃), keep the oven door slightly open by wedging a wooden or silicone spoon into the gap.)
- Bake the egg yolk (for some, with the door slightly ajar) until the outside fully dries out and the texture feels like silicone. This can take anywhere between 90 minutes and 3 hours depending on how much moisture the yolk has before it makes it's way into the oven. Flip the yolk every 45-minutes to make sure it evenly dries on both sides. Once satisfied with the texture remove the yolk from the oven and let it cool. When cooled, the hard-cured yolk is ready to use.
Notes
- If you don’t have a cooling rack that insets with a baking sheet, you can place the cured yolk into a cupcake wrapper and place that into the oven.
- If you don’t have small pinch bowls, use a muffin tin. You can make up to 6 egg yolks at a time, all with varying cure times. And you can remove each without disturbing the others by accident.
- If you have a dehydrator and don’t mind the added time, substitute it for the oven. It’s actually better to dry yolks between 140-145℉ (60-63℃) to maintain the best texture. But, alas, ovens are more common appliances than dehydrators, so here we are.
Nutrition
Frequently Asked Questions
There are lots of ways to use cured egg yolks:
For soft-cured yolks (2-24) hours: A 2-hour cured yolk is perfect to mix into pasta sauces, faux risottos, soups, dressings, and white rice for added creaminess. The 12-24-hour yolks are a really good spread for toast or sandwich bread.
For hard-cured yolks (2-7 days): At this point, slicing and grating for toppings is the way. But but what a beautiful way to go! Use sliced or grated yolks the same way you would use slices of parmesan. Think toppings for pastas, salads, rice bowls, pizzas and flatbreads, etc. I’ve heard it’s delish fine grated over ice cream.
There are honestly so many different ways to use cured egg yolks. Your creativity is the only limit!
As indicated in the recipe ingredient list, kosher salt and sea salt are the best salts for curing egg yolks. However, I don’t recommend large flake sea salt, as it’s definitely not cost effective and the differing sized of the salt flakes can lead to uneaven coverage. Canning or pickling salt are also acceptable options.
Do not use table salt (iodized salt) or rock salt. Iodized salt will make the yolks taste weird and the rock salt has a high likelyhood of puncturing a yolk before it can set. It will also have the same coverage problem as the large flakey salt.
Nope. Sorry. Some of the yolk as well as its moisture will transfer to the salt. (yay osmosis!) Those can be very dangerous at room temperature or even stored in the fridge for long periods of time.
I’ve seen websites say you can speread the salt onto a baking sheet and bake it at a high enough temperature to kill bacteria and dry it back out. However, those proteins and fats and carbs still transfer to the salt. That matter doesn’t just disappear. Bacteria will come back over time.
If you are worried about the cost of salt and how much is needed for this recipe, use a 1:1 ratio of salt and sugar, skip the soft cure option, and cure the egg yolk for 7 days. The longer cure time will ensure the yolk becomes salty enough to use it as a topping.
Soft salt-cured egg yolks (up to 24 hours) retain a bunch of their original moisture content. They will last between 2-3 days in a sealed container, in the refrigerator. Essentially the same amount of time that other animal proteins like poultry would last.
Hard salt-cured egg yolks (2+ days) can last longer because of the increase in salt and decrease in water content. Especially if they were further dehydrated with heat. For undehydrated egg yolks, stick to 5-7 days. Eggs that have journeyed through your home oven can last up to 1month!
Hard-cured and dehydrated egg yolks are safe to freeze and defrost. The moisture content is so low that there is no risk of destroying cellular sructures. Think of the mush most fruits and vegetables turn into after a cycle in the freezer. The yolks may get a tad crumbly, like a previously frozen hard cheese. But, once grated, there won’t be a noticible difference.
I would not recommend freezing soft-cured egg yolks. Their water content is so high that the freezer will completely change their texture.
1. Time: The longer the yolks cure the more moisture they lose and the saltier they become. What you plan to do with the yolk will determine how long you should cure it. If you want a creamy or spreadable yolk, shorten the cure time to 24 hours or less. If you want to grate or slice the yolk over a dish, rest it in salt for 5-7 days.
2. Ratios of salt to sugar: Eggs cured in salt only, are far saltier. I know obvious. So, if you are looking to eat thicker slices of a 2 to 7-day cured egg yolk or spread an entire soft-cured yolk over a dish, it might be best to use a mix of salt and sugar. Especially if you prefer lower sodium foods. I tested a half and half ratio of salt to sugar mixture on 24-hour and 5-day yolks. The 24-hour mixed tastes about the same as a 2-hour “salt only” yolk. While the 5-day yolk tastes a lot like the 2-day “salt only” yolk. The fun part? There is still enough salt to pull out all that pesky moisture. So even with half the salt, the textural difference was negligible!
3. Flavorings: Other ingredients can be added to the salt or salt mix to give the yolk a bit of flavor. The important part when doing this is to only use additions that do not have any moisture, like dried herbs and spices. Moisture is going to slow the curing process and could result in mold if there is too much of it to start with.
The ratio is going to be about ½ a teaspoon (.3-.5g or 2.5ml by volume) total of mild spices and herbs like black pepper, chili powder, cumin, and dried rosemary to 60 grams (¼ cup) of salt; or ¼ teaspoon (.1-.2 or 1.25 ml by volume) of stronger spices like cayenne, kashmiri chili, smoke paprika, etc.
I tested several curing times, including 2 hours, 12 hours, 24 hours, 2 days, 5 days, and 7 days. Each subsequent extension in time produced an egg yolk with a less viscous texture.
2 Hours: At 2 hours, the egg yolk thickens into a texture similar to a fruit curd or thick caramel sauce with the same opacity. I like to top rice or pasta with this style of yolk, then mix it into the carbs for added creaminess. It’s also great to use in sauces for additional viscosity and silkiness.
12 Hours: A 12-hour cure produces an opaque, jammy egg yolk the texture of peanut butter. At this point the yolk is still spreadable and that’s how I use it; on sandwiches and toast.
24 Hours: By the time the yolk cures for 24 hours it sets into two textures and becomes translucent. I like to think of this as the “preserves” stage. The outside of the yolk is the texture of preserved fruit, while the inside is more like the jelly surrounding the fruit. This can still be used as a spread, but I recommend the texture of the 12-hour yolk over the 24-hour yolk. The 12-hours yolk has better texture consistency.
2 Days: At 2 days the yolk solidifies into something sliceable. At this point I believe it’s best to go the route of a hard-cure and further dry out the egg yolk in a dehydrator or oven. It will promote easier slicing. I did not care for this particular cure time, because it was too hard to spread and still to moist to grate. And because of the moisture content, they needed 30-45 minutes more time than the recipe calls for in order to dry out.
5 Days: Day 5 brings a much denser yolk that is solid, but still smooth on the inside. It’s kind of like the texture of fudge. This is my preferred curing length for a hard-cured yolk. I think the resulting texture, after dehydration, is better than the 7-day yolk.
7 Days: And lastly, day 7, cured yolks are very firm but still tacky on the outside. These yolks are more forgiving to work with and dry faster in the oven. But the extra days to wait left me impatient when the earlier yolks were already so good. lol.
Baking: In this recipe I use an oven because it is both quick and accessable for anyone looking to make cured egg yolks. Baking offers a quicker dry time than both air drying and dehydrating, but it requires more prep and is less set and forget. (As communicated above, nest a wire rack on a baking sheet, place parment paper on the rack, and set the yolk on top of the paper. Bake between 150-170℉ (65.5-67.8℃) from 90 minutes to 5 hours, until the egg yolk is dry to the touch.)
Air drying: This adds another 1-3 days to the readiness timeline. And it must be done in a refrigerator to keep bacterial growth at bay. The low humidity in a fridge promotes dehydration. In fact, this method is the same process used to dry-brine beef or crisp chicken skin for better wings. (Simply place the rinsed and surface-dried yolk onto a plate or into a clean dish and set it near the back of the fridge until the yolk is fully dry. Make sure to flip the yolk every day, so it can harden on both sides.)
Dehydrating: Not a lot of people have a dehydrator at home, so this is a touch less accessible than the other options, but it will provide the best texture all the way through if your oven does not heat below 170℉ (67.8℃). (To dehydrate the hard cured yolk for grating, place it on a piece of parment paper and dehydrate it at 140℉ (60℃) for 1.5-2 hours. Again, make sure to flip the yolk halfway, so it dried uniformly.)
The first line of defense is using pasteurized eggs. Pasteurized eggs are slowly heated, to kill bacteria without cooking them. After pasteurization, these eggs need to stay refrigerated. If the eggs are from a refrigerated section at the store, they are pasteurized.
The second thing you can do, if you use unpasteurized eggs or you are just generally worried about microbes growing while the yolks cure for several days, is to re-heat the yolks. I also recommend you only make hard-cured egg yolks only, since they are cooked after curing. Follow the directions for the oven or dehydrator above. Or sous vide the yolks at 140℉ (60℃) for 1 hour and then move them to either your oven or dehydrator for a quick 20-30 minute dry out. Any of these options will do. However, the most reliable and safe is the sous vide.
Why? Heat transfers better through liquid. So, the dryer the yolk the more difficult it is to not only heat but also maintain a constant temperature. The sous vide is the perfect device to meet both needs: keep a constant temperature and stop the yolk from drying out further. And the best thing? There is no need to even reach 165℉ (74℃) to kill salmonella if you do not want to.
“The rate at which the bacteria die depends on many factors, including temperature, meat species, muscle type, fat content, acidity, salt content, certain spices, and water content. The addition of acids, salts, or spices can all decrease the number of active pathogens.”1 Meaning a cured egg yolk has less microbial activity from the salt and or spices as well as the loss of moisture. However it’s fat content, thickness, and protein type requires it to cook at either a low temperature for an extended period of time or a high temperature for a very short period of time. This is especially true for eggs that are not pasteurized.
According to the USDA, poultry must cook to 165℉ (74℃) to instantly kill Salomella. We ignore that temperature in my house. Salmonella can also be killed at lower temperatures over more time. I could not find a chart for eggs specifically, so I’m providing a USDA chart2 for chicken products with up to a 12% fat content. To be on the safe side for density, reduction of moisture, and much higher fat content, I recommend increasing each time by 10-15% to cover your bases.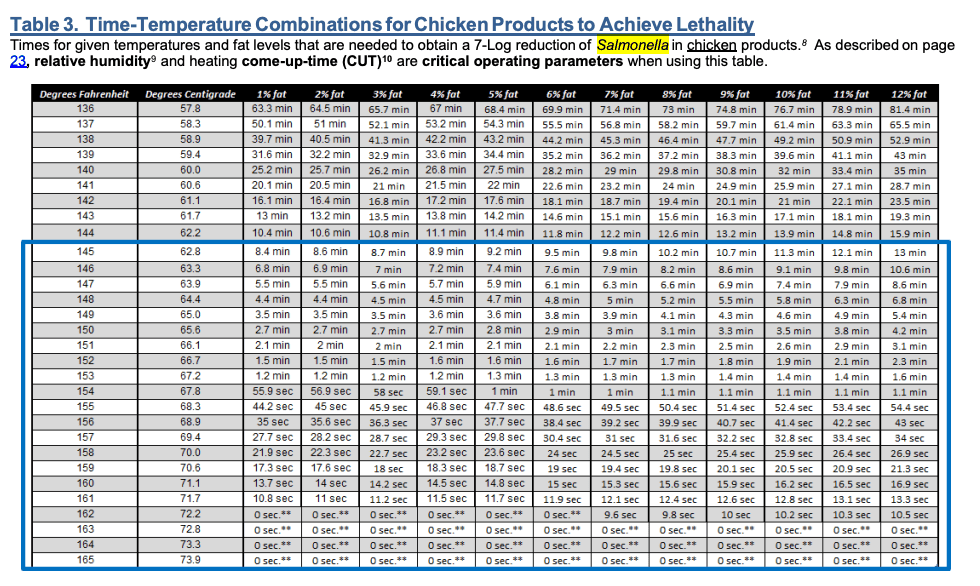
At 160℉ (71℃), lower than the standard of165℉ (74℃), the proteins in egg yolks contract and form tough bundles. To keep those bundles from tightening, low and slow cooking is necessary. As you can see, holding egg yolk temperatures at 140℉ (74℃) for roughly 38-40 minutes will do the same job as 1 second at 165℉ (74℃). If you follow my instructions for any of the heating and/or dehydrating options, this temperature and time are met with ease.
Hope this helps you feel safer! 🙂
Citations:
1. Baldwin, Douglas E. “Sous Vide Cooking: A Review.” International Journal of Gastronomy and Food Science, vol. 1, no. 1, 2012, pp. 15–30. ScienceDirect, https://doi.org/10.1016/j.ijgfs.2011.11.002.
2. United States Department of Agriculture, Food Safety and Inspection Service. FSIS Cooking Guideline for Meat and Poultry Products (Revised Appendix A). Dec. 2021, Document ID FSIS-GD-2021-14. U.S. Department of Agriculture, https://www.usda.gov/sites/default/files/guidance-documents/FSIS.%20FSIS%20Cooking%20Guideline%20for%20Meat%20and%20Poultry%20Products%20%28Revised%20Appendix%20A%29.pdf.

There may be affiliate links in this post. A Little Spoon, LLC is a participant in affiliate advertising programs designed to help content creators earn fees by linking to affiliated sites.