Sweet & Sour Candied Citrus Slices
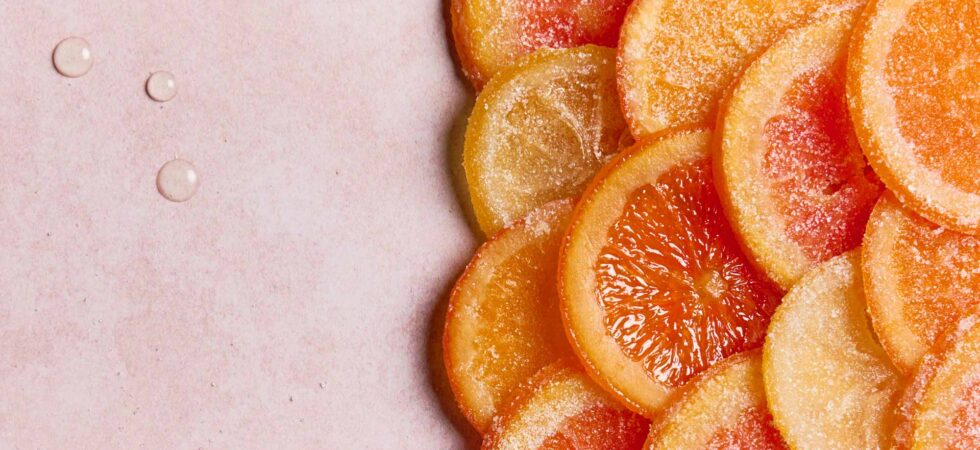
Sweet & Sour Candied Citrus Slices are my new obsession. For those of you who know me, you know I do not have a major sweet tooth. There needs to be something balancing straight sugary sweetness; something sour, spicy, or bitter. These have a hint of bitter and a zing of sour. Now that I think about it, some chili would probably send this. BRB, while I pull out my tajín.
If you like sour patch kids, these are the homemade treat/garnish/topping for you!
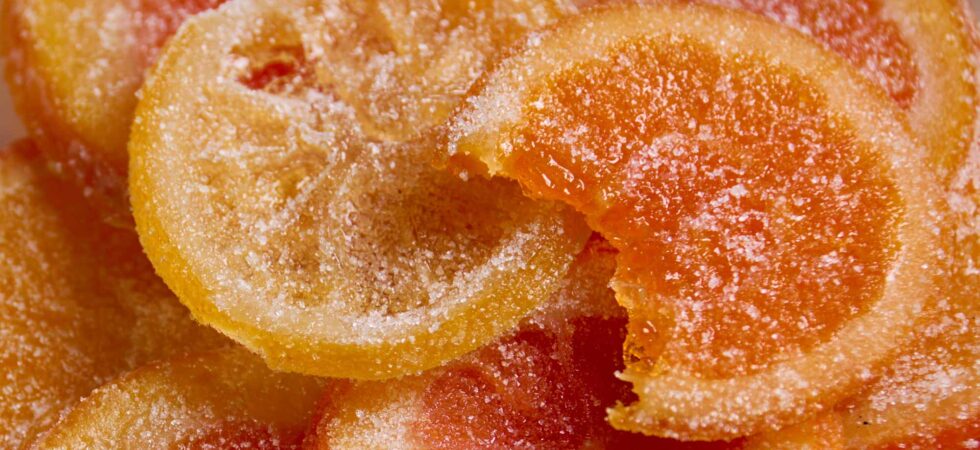
Get the Recipe: Sweet and Sour Candied Citrus
Ingredients
- 2-3 lemons, limes, or oranges
First Boil Ingredients
- 8 cups water
- ½ teaspoon or 1 teaspoon baking soda, (see instructions or notes)
- 2 teaspoons Diamond Crystal kosher salt
- Water plus ice for an ice bath
Second Boil Ingredients
- 1 cup granulated sugar
- 1 cup water
Coating Ingredients
- ½ cup granulated sugar
- 2 teaspoons citric acid
Equipment
- 1 knife
- 1 cutting board
- Food processor with slicer attachment (see notes for other slicing options)
- 1 large pot
- Measuring spoons
- 1 medium/large bowl
- 1 spider or slotted spoon
- 1 12" (30.5cm) or larger saucepan or wide-bottomed pot
- measuring Cups
- 1 fork
- aluminum foil
- 1 wire cooling rack
- parchment paper
Instructions
- So, here’s the deal, each of the three citruses I tested — lemon, lime, and orange — have either a different boiling solution or boiling time. To make sure that everything is easy to follow, I’ve written the recipe for oranges and given additional information in the recipe instructions and again in the notes. This way, nothing gets overlooked.Okay, let’s get started.
- First, clean your choice of citrus by giving the rind a good scrub. Then slice a bit off one end of each fruit, to create a flat surface for slicing. Using the slicer disc and large chute on a food processor (more slicing options in notes and FAQ) cut between 12 and 20 even slices, all about ⅙ in (4mm) thick. Remove any seeds you see from the slices and set them aside.
- Next, pour 8 cups (1.9L) of water into a pot on your stovetop. Then add in the salt and ½ tsp (2.8g) of baking soda* and stir them to combine. (Lemons also use ½ tsp or 2.8g per 8 cups of water. Limes use 1 teaspoon or 5.5g ) Turn on the burner to medium high heat and bring everything to a rolling boil.
- While the water is heating up, fill a medium sized bowl roughly ⅓ of the way with ice; then add water until the ice floats about 2in (5.08cm) from the bottom of the bowl. Give the ice and water a good mix to make sure it's very cold.
- Now that the water is boiling, add the orange slices to the water using a spider or slotted spoon. Let them boil for 3 minutes*. (Lemons boil for 3½ minutes and limes boil for 5-5½ minutes) Take the slices out gently and place them directly into the ice bath to stop any carryover cooking and preserve color. If all the ice melts while you are blanching, just add more to the bowl.
- Let the slices sit in the ice water for 3-5minutes. Then, take them out of the water, pat them dry, and set them aside.
- On the stove top, add 1 cup (205g) of sugar and 1 cup water (240ml) by volume to a 12in (30.5cm) sauté or fry pan. Turn the burner to medium heat and stir until the sugar is completely dissolved.
- Once dissolved, turn the heat to low and add in the citrus slices. Let them simmer for 60 minutes, flipping them once with a fork during the process.
- Before the slices are done, prep a baking sheet by covering it with aluminum foil and setting a cooling rack on top of it. Turn off the burner, take the slices out of the syrup and lay them on the rack to dry. They will need 24-48 hours to dry enough for the coating. You’re looking for the slices to be just slightly tacky and sturdy enough to hold up without immediately folding over.
- Mix ½ cup (102g) of granulated sugar with the citric acid and then coat the orange slices. Enjoy your sour patch citrus when done. 🙂
Notes
- A mandolin slicer is a good second option, if you don’t have a food processor with a slicer attachment. You can also slice with a knife, but it’s very difficult to get even slices. Make sure your knives are sharp if you decide to go this route. Citrus is round and a dull knife is more likely to catch instead of cutting through them.
- Make sure to use citrus that feels tight and not soft or over ripe. This may be the only case where you want to choose citrus that feels like the peel is thicker and more textured.
- Blanching (boiling and cooling) the citrus removes the bitterness from the pith, please don’t skip this step.
- Oranges: ½ tsp (2.8g) baking soda and 3 minutes for the first boil
- Lemons: ½ tsp (2.8g) baking soda and 3½ minutes for the first boil
- Limes: 1 tsp (5.5g) baking soda and 5 to 5½ minutes for the first boil
- This recipe is scalable. Double or triple it if you want to make more slices at one time. Make sure to use your widest pan or pot for the second (simple syrup) boil.
- Store candied citrus slices in an airtight container, sandwiched between layers of wax or parchment paper. They can be kept for 1 month on your countertop or several months in your fridge.
- I’ve noticed the sourness of the coating begins mellow over time. So, be aware, they may need a re-coat.
- Skip the coating or just use sugar if you want these sweet. You can also dip or drizzle them in chocolate for a decadent variation.
Nutrition

Frequently Asked Questions
There are three ways to slice citrus for candying:
– Food Processor: The most safe and precise way to slice citrus us by using the slicer disc in conjunction with your food processor. Most middle to high end food processors come with this attachment now. So, it’s time to get comfortable experimenting. Once you start, I promise you won’t go back.
TIP: Push the citrus into the left side of the chute (if your blade spins clockwise) until it’s snug. When the blade spins, it will continue pushing the citrus into the same corner and keep it in place. If you start on the right or place the fruit in the middle, it could fall over and then you have sideways slices.
– Mandolin Slicer: This option is also very precise. Depending on your mandolin you may have removable plates to change thickness instead of a numbered adjustor. You’ll likely need the thickest setting for these slices if you have removeable plates.
TIP: A mandolin can be dangerous if you aren’t careful to protect your fingers and maintain constant speed while slicing. Because citrus has so many different textures, it catches easier on the mandolin blade than something like a potato would and is a little more difficult to cut than a lot of other fruits and veggies. If you don’t plan to use the guide your mandolin slicer came with (I see you Evil Knievel) please use cut resistant gloves.
– Knife and cutting board: These are the simplest and most accessible cutting tools in your kitchen. And, while they will work for this recipe, it will be more difficult to get even, consistent slices.
TIP: Make sure your knife is sharp and curl your fingers into a claw, resting the knife against your knuckles when you cut. If you use gentle pressure to force the bottom of the blade inward while you slice, it will help keep your knife, and resulting cuts, straighter.
Yes, but there’s a caveat.
When you freeze citrus, it does make the whole thing a more uniform texture. Since it’s harder to squish as you slice, you will end up with more even slices. Sounds great right?
Well, during testing, I noticed freezing the citrus produced a more delicate slice once it was back to room temperature. Because the liquid in the citrus expands when it freezes, it breaks some of the cellular structure. Then, when those broken cells get boiled, they disintegrate. So, the more frozen the citrus, the harder it is to keep them intact during the first and second boils.
I’m not saying candying doesn’t work; just that your citrus creations may not be as pretty, and you may lose some of the tastiest parts of the fruit during the process.
I leave it up to you on which trade off to choose.
I tried several thicknesses when making this candy. I would not recommend making slices less than ⅛in (3mm) thick. The thinner you go, the less structure the center of the citrus slices have to hold up against boiling them. They also dry out much more and can get almost crisp. As, I was looking for intact slices and a bit of a jellied center, under 4mm was too thin for my tastes but definitely doable.
Slices thicker than ⅙in (4mm) took longer in all respects. As a matter of fact, I almost couldn’t get the bitterness out of the lime slices during the first boil; And drying times increased quite a bit as well.
If you want thicker slices than the recipe calls for, I will only suggest using oranges or at least experimenting with them first. They are sturdier than lemons and less bitter than limes, making them easier to play with.
Baking soda isn’t 100% necessary to remove the bitterness from your citrus slices, but it does move things along much faster.
I’ve attempted making candied citrus several times in the past and the recipes that skip boiling always tasted like I was eating rind. So, I made sure to stick to recipes that had this first boil step. Over the years, I started boiling my slices longer and longer past the listed 1-2 minutes, searching for a scenario in which that bitterness is completely gone, and I just couldn’t get there. Especially with limes.
Enter baking soda. Adding baking soda to the water during the first boil, weakens the pectin in the citrus and make the slices softer without destroying them. It also pulls the bitterness out of the peels more efficiently, so you aren’t left with citrus “candy” that tastes like anything but.
Now, if you like that bitterness, feel free to try a shorter boil time or leave the baking soda out of the recipe. I don’t want to get in the way of anyone’s taste buds. If you are a quad-hopped, astringent loving person, you might prefer some bitterness.
The first boil before blanching the slices, is meant specifically to soften the citrus rind and extract some of the bitterness. You know you’re done boiling when you are happy with the level of bitterness in the peel. I’ve given times in the recipe instructions that were to my own tastes.
How do you know if you like the taste? Easy. Take a bite out of one of the cooled slices and see if you are happy with the level of bitterness there. If you aren’t return them to the pot for a little more boiling. Cool in the ice bath again and taste again. Nothing too scary. Just a do-over. 😉
I would not recommend it. In theory, simmering the slices in only simple syrup is possible, but there’s no telling how long they would need to cook until they are thoroughly imbued and the bitterness is gone. By that time, the syrup will have thickened too much and begun to caramelize. While this can be a delicious flavor. The citrus will taste more like the syrup than their true flavor profiles. Additionally, the thicker the syrup gets, the longer the citrus takes to dry. No one wants to wait 4 days for their slices to be ready.
I mean, you don’t have to, but they will all have varying levels of firmness and bitterness if you don’t. Oranges are the least bitter and softest citrus, so they need less work than lemons do. And limes are the fussiest of all the citrus I tested. (see notes for baking soda amounts and first boil timing)
I did experiment with cara cara, navel, and satsuma oranges during testing, so I’m fairly confident in the consistency of the orange instructions. In full transparency however, I did not attempt, working with grapefruit or pomelo (that’s why they aren’t listed in the recipe). They are just so large, and their piths are so thick, I couldn’t imagine them making good candies.
Unfortunately, no. The peel is kind of what keeps the citrus together. I did attempt to do this, so I figured it out the hard way. I thought I could make some oleo saccharum with the peels then slice and candy the pith and fruit. Everything broke into pieces during the first boil. It was a mess.
Yep. You can dry them either in a dehydrator (lemons at 115°F or 46°C and oranges at 135°F or 57°C) or in the oven, on the lowest setting available, for at least 2-3 hours.
Also, no. The syrup will be much thicker by the time an hour of simmering has passed. In theory, you could add water back into the syrup to loosen it up. However, your ratio of sugar to water will be off. Additionally, if any caramelization has started in the first batch of simple syrup, that flavor will carryover and increase in the second batch. Essentially what this means is that the sharp, clean flavor of the citrus slices will be muted in your second batch.
It’s better to just double the recipe at the start.
This is an easy one! Add some water to the syrup, 1tbsp (15ml) at a time, until it thins out to your desired consistency. Preferably, back to where it was at the start or during the first half of simmering the slices.
Oh yeah! The leftover syrup is great in cocktails and mocktails. I have a Oaxaca Old Fashioned Cocktail recipe that this citrus syrup (lemon or orange) is delicious in. You could also substitute candied lemon syrup specifically for the rosemary triple simple syrup in my Barrel-Aged Bee’s Knees Cocktail or for the oleo-saccharum in this Lemon Drop Martini.
Food-wise, drizzle it over some fresh fruit or use it in your next vinaigrette. Have fun experimenting with flavors.

Hi! Currently making these, i’m excited to see how they come out! I also added blood oranges, grapefruit, and a pomelo to the mix! Im realizing I completely forgot to add salt to my water when pre-boiling before blanching. I only added baking soda. I’ve never made these before so I’m curious to see how they come out. Do you think missing the salt is going to affect the bitterness? Thanks!
Hi back!
If you forgot salt, don’t worry about it! Essentially, the salt creates a very mild saline solution that is not enough to significantly alter the flavor of the citrus slices. It’s really just to make their flavors pop a bit more and help reduce any residual bitterness (sweet and salty tone down bitter flavors). And, even then, it really is subtle. It’s really more important for anyone who plans to just do the candied part and not the sweet and sour coating part. But it doesn’t hurt either recipe, so it’s kind of a catch-all.
I’d love to hear about how the grapefruit and pomelo went over! I couldn’t fit them in my slicer and thought they might be too big to stay together; Love a queen who is happy to experiment and work outside the box! 🙂
Hey! So everything turned out beautifully. I ended up cutting all the slices just with a sharp knife, so not all of them are perfect. It worked out though, because after coating everything in the sugar/citric acid mixture, I took the most “imperfect” ones and dipped half of each one in melted dark chocolate and sprinkled crushed freeze-dried raspberries and strawberries on top with coarse sea salt. I chose any slices that had one side slightly thicker than the other and dipped the thicker side, so the chocolate would help with the extra rind. This was kind of annoying since the sugar coating ended up mixing with my melted chocolate, so I may do that differently next time I make these. The grapefruit are beautiful, they’re vibrant and delicious. Probably one of my favorites of the batch, along with the blood orange. Also, note on the pomelo: I cooked it a bit longer than everything else (basically took everything else out of the pan but the pomelo slices, and gave them an extra 5-ish minutes) and I didn’t need to – the fruit ended up crystalizing. I cut it into quarters and the flavor is good, but not my favorite. It was too sweet because I simmered it too long. I may or may not try the pomelo again, but it was fun to experiment with! I jarred up all of that syrup to gift as well.
Thank you so much for the update! Now I’m definitely making grapefruit slices. They are my favorite citrus. Consider me influenced. 🙂
On the pomelo: If they crystallized, it sounds like the syrup might have cooked down a bit too much. If you want to take a chance on them in the future, add some water to thin out the syrup before or as you cook them if the syrup gets any thicker than a 1:1 simple syrup consistency.
Happy Holiday!