French Onion Grilled Cheese
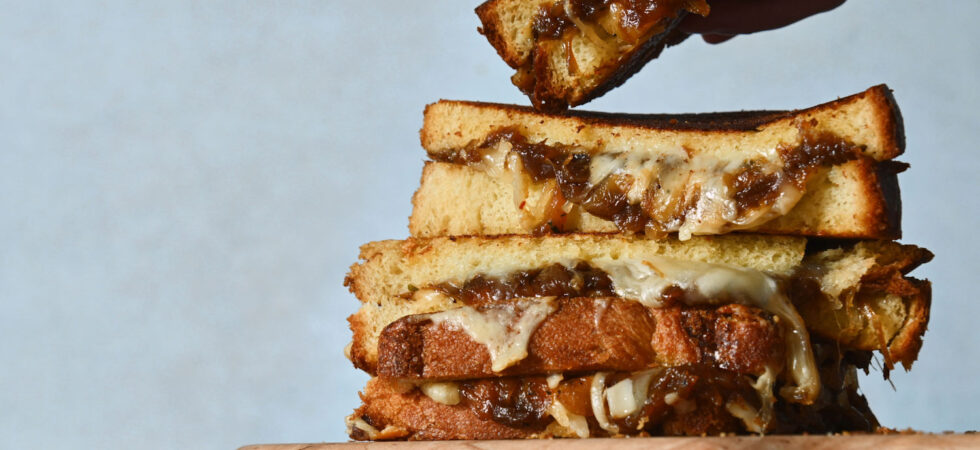
Go ahead, indulge in a savory, gooey French Onion Grilled Cheese. Heal your inner child in adult style. With reduced beef stock, caramelized onions, fontina and gruyère cheeses, and buttery brioche bread, it’s the combo that lets you have your soup and eat it too!
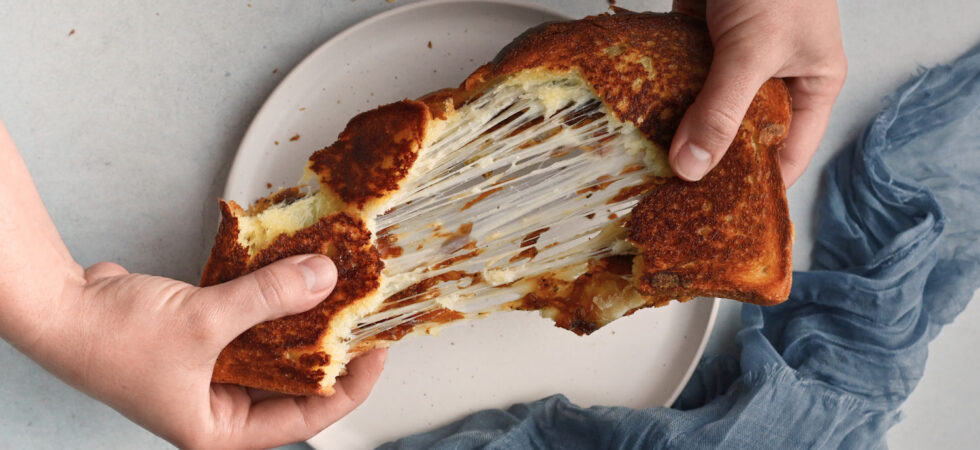
Get the Recipe: French Onion Grilled Cheese
Ingredients
- ½ sweet onion
- ½ yellow onion
- ½ white onion
- 1 medium shallot
- 5 tablespoons unsalted butter
- 1 tablespoon beef fat/tallow
- ½ teaspoon kosher salt
- ¼ cup beef stock
- ¼ teaspoon marmite
- 2 cloves of roasted garlic
- ¼ teaspoon fresh ground black pepper
- ¼ teaspoon mushroom powder
- 1 teaspoon fresh thyme leaves
- ¼ teaspoon sherry vinegar
- ¾ cup fontina cheese
- ¾ cup gruyère cheese, (aged a minimum of 12 months)
- 4 slices brioche bread, (¾in or 2cm thick)
Equipment
- knife
- cutting board
- Measuring spoons
- measuring Cups
- stainless steel sauté pan or enameled dutch oven
- cheese grater
- nonstick skillet or griddle
- flat topped spatula
Instructions
- First, cut the top and bottoms off of your onions and then chop them in half. Lay the onion pieces flat-side down and make 1/4-1/2in (.6-1.2cm) slices all the way across. Don’t worry if they aren’t exactly even. It will all cook down by the end. Repeat this process with the shallot, but make finer slices (1/16-1/8in or .16-.3 cm)
- Now that your alliums are sliced. Place your preferred cooking vessel on the stove top and turn the heat to medium-high. After the pan heats up a bit, add in 1 tablespoon (14g) of butter and the beef fat. Let that melt and begin to foam. Dump the sliced onions into your pan and toss them around in the fat. After a minute or so, sprinkle the salt over the onions and continue moving everything around in the pan, until the onions release their liquid and start turning translucent, this should only take between 5-7 minutes.
- At this point, turn the heat down to medium, medium low heat. You do not want to unevenly cook the onions. This is all about browning (caramelizing) without burning or charring. Cook your onions, low and slow stirring every 5-10 minutes for the next 45 minutes. They will continue to lose liquid as they cook.
- About 30 minutes into cooking the onions, take your cheese out of the refrigerator to sit at room temperature.
- Also around this time, enough liquid will have evaporated that you can add in the beef stock and deglaze the pan a little bit. After adding the stock, stir in the marmite, roasted garlic, black pepper, and mushroom powder. Continue cooking the onions until the liquid has, again, mostly evaporated and they have turned a warm brown color.
- Back to the onions. When done, the liquid surrounding the strands of onion will be creamy, like a thick gravy and the onions will be a deep brown. 2-3 minutes before taking the pan off the heat, mix in the thyme and the sherry vinegar. Set the pan aside and turn off the stove.
- Next, prepare the rest of the ingredients for sandwich making. Grate the cheeses and mix them together into a pile. Butter your brioche slices, with the remaining butter, and setup your workstation. Place one slice of the brioche, butter side down, onto a medium-hot, non-stick pan. Take 1/4 of the cheese pile and spread it over the first piece of bread. Half of the onions get spread over the cheese, and then a second layer (another 1/4 of the pile) of cheese tops the onions. Add the second slice of brioche butter-side up and let it cook until you start to see some browning on the bottom slice of bread.
- Flip the sandwich over and let the other side begin to crisp. Don’t worry about trying to perfectly brown each side in one flip, the first two turns are about making sure the cheese melts enough to fuse the whole grilled cheese sandwich together. Once you see the cheese melting, turn the heat up and then toast the outside of your sandwich to your preferred level of brown.
- When you have reached a desired amount of toasting and melting, on your grilled cheese sandwich, plate it and make your second sandwich with the rest of the cheese and caramelized onions.
- Slice and enjoy.
Notes
- Make the onions up to 3 days ahead, for a quick dinner. It will only take about 10-15 minutes if the onions are ready to go
- Keep in mind that your beef stock may be salty or not, depending on if you made homemade beef stock or purchased it at the store. Please salt to taste, when finishing. This will be especially important if you decide to double or triple the recipe.
- If you want to make my homemade beef stock recipe on the same day as the grilled cheese sandwiches, you will need to add between 7-10 hours to your timeline. The stock can be made and refrigerated 4 days in advance before freezing. And will freeze up to 6 months.
- If your heat is too high, you may need to deglaze the pan more than once to keep the onions from sticking. Try using a tablespoon (15ml) of stock at a time, if you need to stretch out the 1/4c (60ml) of stock. Pour it right where you see any burning onions and scrape gently to loosen them.
- If you want an even crisper sandwich, you can spread more butter onto the toasting brioche as you flip. You can also spread mayo instead of butter on your brioche for more crisp and a little bit of tang.
- If you want even more of a barrier between the onions and the bread, spread butter on the inside of the brioche as well.
Nutrition
Frequently Asked Questions
When you slice through an onion, it opens the cellular structure of the bulb and an irritant called syn-propanethial-S-oxide is introduced to the atmosphere. This sulfuric compound, triggers your lachrymal glands to release tears. It isn’t bad if you are working with a small amount of onions. However, lots of chopping and slicing, like with this recipe, can really get in the way of your prepwork.
Here are some tips that can be used separately or all together.
–Sharpen your knives. The sharper the knife you use to cut your onions, the less cells are broken and sulfuric compounds are released.
–Decrease the exposure of cut onion surfaces to air. Keep the cut sides of the onion face down on your cutting board as you cut. In addition to stabilizing your onion, this will help a bit with tears. After each section/onion cut, move the onion pieces to a covered plate or lidded container. Also, wipe down your board and your knife after each completed section/onion, to soak up the liquid released from slicing through the onion.
–Use a kitchen vent or fan. Cut your onions under a kitchen vent or fan. It helps clear the air of the sulfuric compounds in onions that cause you to cry.
–Wear protective eyewear. Okay, yes for those of you without contacts, this could look ridiculous. But, if you do have the option of slipping in contact lenses, you’ll immediately add a mostly impermeable membrane over your eye. Viola, no tears! Fore everyone else, it’s goggles for ultimate protection, sorry. You can still choose to look cool next to a fan and work through a little bit of tears. No judgement.
Each listed onion has different flavor profiles. These tastes add variety and depth to the flavor of the caramelized onions. If you used only one type of onion, the flavor will be more one note. This difference is obviously more prominent when the onions are uncooked, however the sugar content and underlying flavors do subtly carry through the cooking process.
I suggest using sweet onions (think vidalia or walla walla onions) if you only plan to purchase one type of onion for this recipe. Their sugar content makes them ideal for caramelization. Use the flavor descriptions above to mix and match for your own special blend of onions. Just make sure to keep the overall measure of alliums the same in the recipe.
This recipe uses yellow onion, white onion, sweet onion, and a shallot. Let’s take a look at each one, yeah?
Yellow: Yellow onions have a brownish-yellow papery skin and a yellowish-white flesh. They are stronger and more pungent than other types of onions and offer just a slightly sweet taste. If you ever see Spanish onions and wonder where they belong, they are a type of yellow onion, but are larger, milder, and sweeter than their smaller counterparts.
White: White onions have white, papery skin and white flesh. These onions are crisp, slightly tangy, and cleaner tasting than yellow onions.
Sweet: Sweet onions have yellow or light brown skin and white, juicy flesh. They are are known for their high sugar content and mild, sweet taste. The flattened disc-like shape of vidalia onions are most commonly associated with sweet onions, but that is actually specific to vidalias. Sweet onions can also be spherical like any other onion.
Shallot: Shallots have a brownish-red or grayish-brown outer skin and white, pink, or purple flesh. They have a delicate, mild onion and garlic flavor with a light, slightly sweet taste.
BONUS ONION: Red onions have a deep purple outer skin and red/white flesh. They mild enough that they can be eaten raw and have a slightly peppery taste. I didn’t use these onions in the recipe, mainly because they would have slightly colored the filling. Also, white onions have the same clean taste as red onions, just stronger. If you like red onions, and aren’t worried about visuals, go ahead and use them!
Caramelization is a chemical process that occurs when sugar molecules are heated to a high temperature, causing thermal decomposition. Essentially the sugars break down and then undergo a series of complex reactions. Those reactions, in-turn, form new compounds to produce a range of flavors, colors, and aromas.
During caramelization, heat causes sugar molecules to break down into smaller molecules. these smaller sugars then react with each other to produce a range of volatile compounds, including furans, pyrroles, and aldehydes. These compounds are responsible for the characteristic flavors and aromas associated with caramelized onions, such as sweetness, nuttiness, and smokiness.
At the same time, the Maillard Reaction occurs, which is a reaction between amino acids and reducing sugars. The Maillard Reation produces a range of flavorful compounds, such as melanoidins. This reaction creates the brown color and savory flavor that is associated with caramelized onions.
Lower heat allows for even cooking and better flavor. If the onions burn, it introduces a bitterness to your final product. If you see any burning, either from the liquid made by the onions or the onions themselves sticking to the pan, deglaze the pan with beef stock as quickly as you can. Then, lower your stove top temperature.
You may be tempted to try and cut down on your cook time by increasing your cooktop temperature Yes, your onions will brown faster. However, metaphorically, this is like speeding on the highway. We all do it to get where we are going a few minutes faster. But there might also be negative consequences to our actions if we aren’t careful or watchful. It’s easier to just play by the rules sometimes. Starting over is a penalty of both time and money.
First things first, I used aged gruyère (at least 12 months) and fontina cheese for these caramelized onion grilled cheese sandwiches. Let me give a quick brief on why I chose them.
1. Gruyère (swiss cheese) is the traditional cheese topper for onion soup, so I knew I wanted to keep that sweet, nutty flavor in this recipe. I tried different gruyères aged from 3 months to 12+ months. The 12 months + gruyère was far more flavorful and the nuttiness really punched through the onions in a way that it’s younger counterparts didn’t.
2. Because, gruyère doesn’t stay melty for very long, I added in fontina to take care of that textural component. Fontina is very mild in flavor as well, so it didn’t interfere with the flavor of the gruyère.
Of note: The 1:1 ratio of these cheese gave me the best texture to flavor balance, but you can definitely experiment with different amounts.
Here’s a list of some other cheeses that could work also in a French onion grilled cheese sandwich.
1. Havarti – mild, buttery, and tangy (melty)
2. Provolone – mild, nutty, and tangy (melty)
3. Monterey Jack – mild, buttery, and sweet (melty) – pepper jack for a kick! 😉
4. Goat/chèvre – tangy and earthy (creamy)
5. Brie – earthy, buttery, and nutty (gooey)
6. Cheddar – tangy, salty, and sharp (creamy)
In the name of transparency, I also tested the gruyèye with gouda and havarti in this sandwich during recipe development. The gouda was a little too strong for my tastes. And, the Harvati was tangier than I wanted. It was my goal to have the gruyèye to stand out. So, decide what you like and what flavors you want to pop when you choose your cheese.
Yes, of course! Other breads I’d recommend for French onion grilled cheese sanwiches are rye bread or some kind of rustic white bread. As long as the bread is hearty and can hold up to a heavy filling, you’ll be good to go.
I’m sure most of you have seen the grilled cheese flipping hack video online, but I’m here to say, it works!
Essentially, you take your flipper/turner (what you would use to flip pancakes) and slide it under the sandwich so it’s between your grilled cheese and the pan. Make sure you have enough stability, that when you take the pan away, it can hold the grilled cheese in the air without issue. Now, remove the pan from under the flipper and sandwich and press it to the top of the sandwich, so the sandwich is now in between the pan and the flipper. Turn, everything over together. Now, your pan is on the bottom, the other side of the sandwich is on the cooking surface and the flipper is on top. By using this technique, the sandwich movement is minimal and there is less chance of the bread sliding around or the cheese/filling falling out.

