Maple & Brown Butter, Butter Tarts
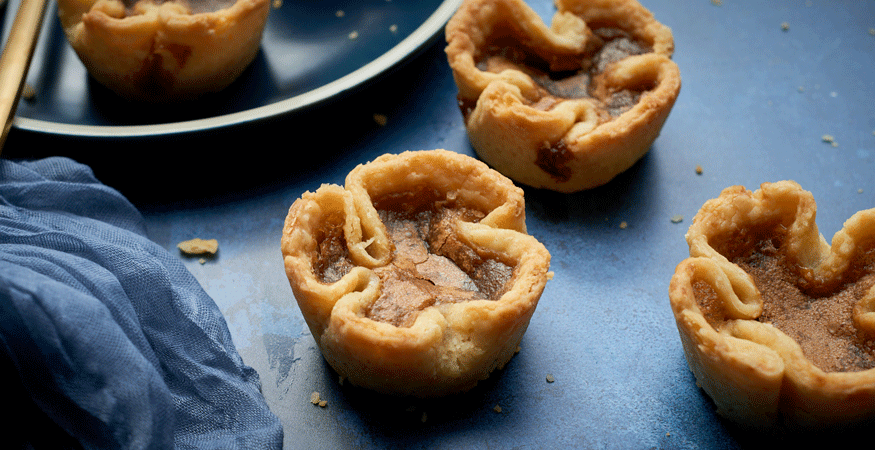
I feel like people fall on two sides of the butter tart spectrum. On one side is “haven’t had one yet” and on the other is “can’t live without them”. I’ve had one, so I fall squarely on the “can’t live without them” category; especially these Maple and Brown Butter, Butter Tarts. There’s just no going back!
You may find it interesting that most butter tarts don’t in fact have maple syrup in them. I personally think that’s a travesty.
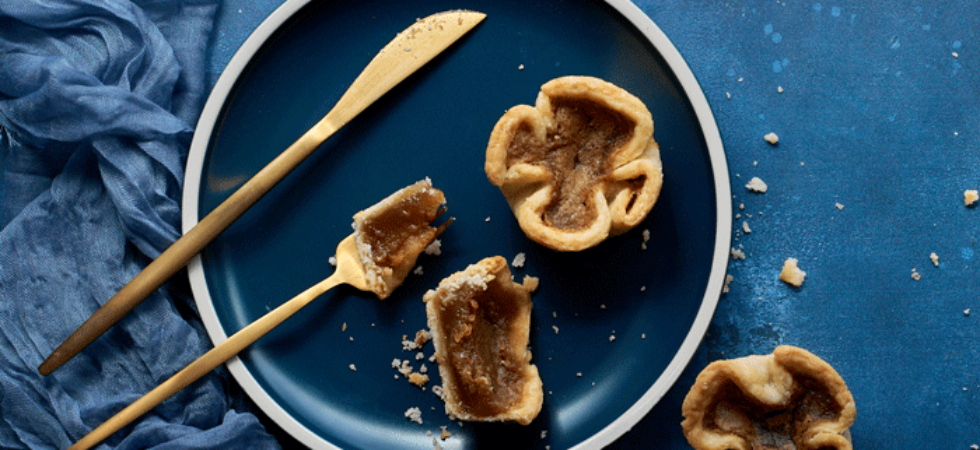
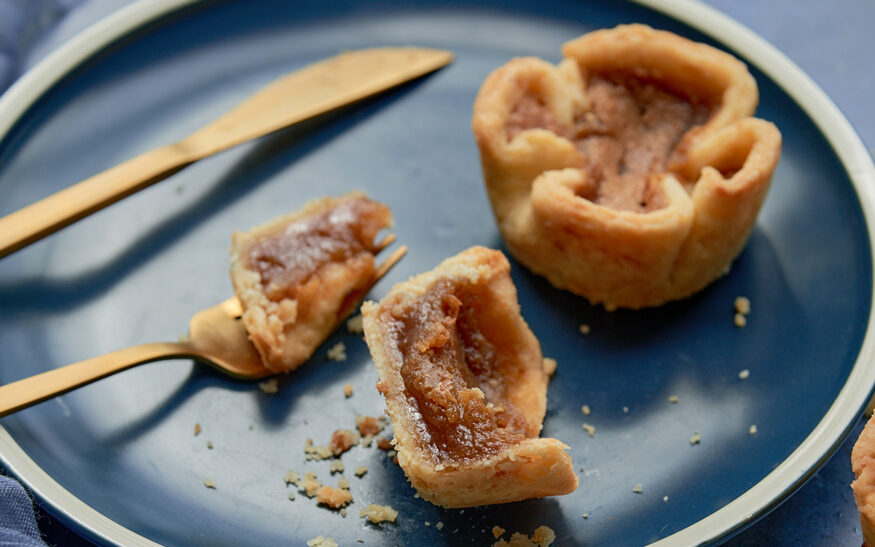
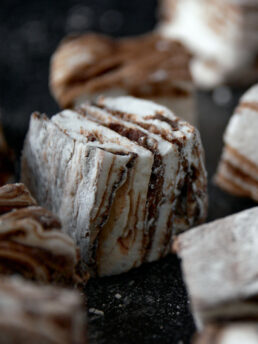
Butter tart filling typically incorporates corn syrup and melted butter, which I have substituted for a reduced maple syrup (for obvious reasons) and brown butter (to take more liquid out of the filling and give it an even deeper, buttery flavor).
Surround that with a soft, flakey pastry crust and this Canadian dessert just doesn’t miss.
Get the Recipe: Maple & Brown Butter, Butter Tarts
Ingredients
Pastry Dough
- 1⅛ cups all purpose flour
- 1⅛ cups cake flour
- 1 tablespoon brown sugar
- ½ teaspoon Diamond Crystal kosher salt
- 11 tablespoon unsalted butter, very cold
- ¼ cup shortening, very cold
- 5-6 tablespoons ice water
Butter Tart Filling
- 1⅓ cups pure maple syrup, reduced to 1c (320g or 240ml)
- ½ cup unsalted butter, browned
- 1 cup brown sugar, lightly packed
- 2 eggs
- 2 teaspoons vanilla extract
- zest of ¼ lemon
- ½ teaspoon Diamond Crystal kosher salt
- 1 teaspoon lemon juice, (optional: see recipe instructions)
Equipment
- 1 Small Sauce Pot
- 1 kitchen thermometer
- 1 10in (25.4cm) saucepan
- 1 silicone spatula
- mixing bowls
- 1 food processor or bowl with pastry cutter
- 1 microplace or fine grater
- 1 Rolling Pin
- 1 5in (12.7cm) cookie or biscuit cutter (I use a yogurt or sour cream container top)
- 1 12-cup muffin tin tray preferably dark in color
- 1 small ladle or cup with pour spout
Instructions
- Measure out and cut the butter and shortening for the dough into 1/2in (1.25cm) cubes. Then, put them in the freezer while you prep everything else.
- For the filling, simmer the maple syrup in a small saucepan over medium low heat for about 5 minutes. Then, increase the temperature to medium-high or high. Use a thermometer to bring the maple syrup to between 220-240°F (104-115.5°C) for 2-3 minutes. The lower end of the temperature range will make a mostly set, slightly oozy filling while the higher range will help produce a set filling once fully baked and cooled. The maple syrup will bubble and foam quite a bit, just let it.
- By now, the syrup should have reduced down to roughly 1 cup (320ml). If you have a bit more, just pour to the measurement needed. If you have slightly less, don’t worry. It won’t affect the filling. Turn off the heat and set the syrup aside.
- Next, add the butter for the filling to a small saucepan on medium heat. Make sure to continuously stir or swirl the pan as the butter melts and then froths. When you see the milk solids turn a light brown color, turn off the stove and move the pan from the heat. The butter will continue to cook and should end up a nice warm brown. When the brown butter cools a bit, add it into the maple syrup and whisk them together until incorporated. Set aside and move onto pastry prep.
- For the pastry crust, add the flour, sugar, and salt to a food processor and pulse 3-4 times until fully mixed. Fill a small bowl roughly 1/3rd of the way with ice; then add water until the ice floats off the bottom of the bowl. Give the ice and water a good mix to make sure it’s very cold and set aside.
- Now, take the butter and shortening out of the fridge and add to the food processor. Pulse into the flour mix (3-4 times) until small pea-sized pieces form. At this point, you can slowly add the ice water a tablespoon (15ml) at a time.
- As you add water, you will see the dough lose its sandy texture and turn yellow as the flour hydrates. You should need between 5-6 tablespoons (75-90ml) of ice water to bring the dough together. To test if it’s ready, take off the top of the processor and pinch some of the dough between your fingers. If it sticks together, you can stop there. If it’s still a little sandy and falls apart, add some more water.
- Once you have your dough ready, you want to keep it as cold and unworked as possible. Dump the dough out onto a lightly floured surface or onto wax paper. Lightly press the dough into a ball and then cut it in half (≈285g per half). Quickly and gently make each piece into a log that can easily be cut into 6 equal pieces. Do not overwork the dough; try to work quickly, as the heat from your hands will melt the butter and the dough will not turn out as flakey.
- Wrap the pieces in plastic wrap and let rest in the fridge for a minimum of 90 minutes and up to 24 hours. Resting the dough allows the gluten to relax and hydrate, which makes rolling it out much easier.
- When ready, return to the filling. With a spatula, not a whisk (it adds too much air), mix in the brown sugar, salt, vanilla extract, lemon zest, and eggs until completely incorporated. If you are using lemon juice, add that now as well. Place the filling in the fridge until it's time to pour it into the tarts.
- When your filling is made and your dough is rested, preheat your oven to 425°F (240°C).
- Then, take a dough log out of the fridge and cut out 6 equal pieces. They should be roughly 44g per piece. Cover the pieces you aren’t working with, so they don’t dry out. One at a time roll out a disk to a little more than 5in (12cm) in diameter and cut out a circle of pastry dough between 4.5-5 in (11-12cm). Fit the pastry circles into muffin cups making sure that the dough goes all the way to the bottom of the cups and is flush to the walls, where the dough doesn’t overlap or ribbon near the top. Repeat with the other pieces and then with the second log of dough.
- When your tart cups are ready, take the filling out of the refrigerator and mix it again to re-distribute the brown sugar which will have settled to the bottom. Then fill each dough cup ⅔ to ¾ full with syrup mixture. Bake on bottom rack of the oven for 20 to 25 minutes. Keep an eye on the surface layer of the filling. It will puff up into a dome and turn a medium-dark brown. When the top breaks and bubbles the tarts are ready.
- Take the maple butter tarts out of the oven and cool them for 10 minutes. Then, try spinning each tart (still in the tin) 360° by gently pushing in a circular motion with your fingers positioned at their top and bottom. If you can gently spin the tarts as they cool, they will be easier to remove later. If you have a few tarts that won't spin after cooling for 10 minutes, give the crust another 30 minutes more to set and use a sharp paring knife to slide between the tart and the tin. Then try spinning again.
- Make sure the tarts are completely cool before removing them from the pans. You can do this by either popping the tarts out with an offset spatula or paring knife OR you can gently flip the muffin tin over and let the tarts fall out, turning them over as you go.
Video
Notes
- If you want a more liquid center, use the lemon juice (ingredient list). You can also use equal amounts of white vinegar to sub the lemon.
- If you make the filling all at once (no in-between pastry steps), be sure the maple syrup/brown butter mixture is below 140°F (60°C) before adding the eggs or you’ll have scrambled eggs in your filling. Eww…
- You can work this recipe around your schedule. Before baking, refrigerate the filling for up to 3 days. The pastry can chill for up to 1 day or freeze up to 2 months. After baking, the butter tarts can sit at room temperature for a week and freeze for up to 2 months.
- These tarts are a traditional filling without raisins. You can, of course, add some to the bottom of the pastry cups before adding the filling.
- Other quick filling additions can be: toasted walnuts or pecans; chocolate morsels/chunks; and currants. I like to fill in the rest of the tart with peanut butter and top it with melted chocolate, after they cool.
- If you want a mocha version, for every 1/2c (120ml) of filling add 1tbsp (7g) unsweetened cocoa powder and 1/2tsp (1g) espresso powder.
Nutrition
Frequently Asked Questions
Well, these flours have a lower protein percentage (8-9%) than all purpose flour (10-12%). Less protein means less gluten. And, less gluten leads to a lighter, flakier, and softer all around crust.
The reason it’s not all cake flour is because if you overdo soft wheat/low protein flours, the crust will just crumble and not hold shape enough to get the tarts out of the tin. My aim wasn’t to create the softest crust. It was to make a tart crust with enough structure to support the custard filling, but also have a crisp first bite and melt in your mouth texture.
Easy answer, moaarrrrr flake! Shortening well, shortens gluten strands to create a more crumbly texture than butter. It also doesn’t have any water in it, like butter does. As fats and oils are what keep gluten from developing, no water means less gluten and more flake. Shortening also makes the dough easier to handle and work without melting and combats dough shrink during baking.
Here’s the breakdown. I made three different pie crusts while developing this recipe:
1. All butter: very sturdy and crisp, but just not enough give when biting into the tart. Also, I found that the baked dough took on a nutty quality that overpowered the filling and didn’t let its flavor shine through.
2. Half butter and half shortening: This dough is just perfect, for a big pie with a set filing, that you’d slice and serve to guests, but it was not made for these tarts. Every single one broke while I was trying to extract them from the tin. I’m not completely complaining though, because it gave me an excuse to just eat them with a spoon and try again!
3. 3/4 butter and 1/4 shortening: This is the version I landed on. This dough held shape coming out of the tins and was still delicate. The ratio also, kept the tarts flakey with a lovely buttery flavor.
Here’s the deal with the dough. You can use only AP flour if you do not have access to cake flour. You can also only use butter if you aren’t interested in using shortening. But, it won’t be quite the same, because the cake flour and shortening are what really make this pastry tender and light.
If you are still set on substitutions, here’s what my imperial (U.S.A.) people need to know:
ONLY AP FLOUR: AP Flour has more protein and gluten than cake flour making it denser, so imperial people will need to decrease the 3/4c (90g) of cake flour to 2/3c (90g) of AP flour. You will most likely need to increase your ice water to bring the dough together as well. Because all purpose flour has more protein, it will also need to absorb more water to fully hydrate.
ONLY BUTTER: Butter is also denser than shortening so use 2.5tbsp (35g) of butter in place of the 3 tbsp (35g) of shortening.
Anyone else seeing a pattern here for why measuring by weight is easier than measuring by volume? Honestly how do we not always cook with metric?!?
If you are using imperial measurements, make sure not to scoop flour directly out of the bag/container with your measuring cups. Use a spoon to scoop and pour flour into your measuring cups and then level with a knife.
If scooped directly from the bag into the measuring cup, the flour compacts A LOT. In fact, you may unknowingly add up to 30% more flour to your recipes, which will throw off your fat and liquid ratios immensely. A typical cup of flour, when scooped correctly, weighs roughly 125-130g. If you have a scale, you can do a little science experiment by trying each means of scooping. See for yourself, how different the weights are between the techniques.
Good news! You do not need to butter, grease, flour, or line the muffin tins. I tested all the options and saw no difference between using them and doing nothing.
There is enough butter in the dough that it won’t stick unless the filling escapes. And, that is avoided by not having cracks in the pastry or overfilling the dough cups. If the filling does escape through a crack in the dough or over the top of the tart, wait for it to cool completely and use a sharp paring knife to break the tart away from the tin. Be as gentle as you can, the crust is delicate. Worst case, you eat a maple & brown butter, butter tart or two right out of the tin with a spoon. Not the worst problem to have IMO. Especially with these!
There may be affiliate links in this post. A Little Spoon, LLC is a participant in affiliate advertising programs designed to help content creators earn fees by linking to affiliated sites.
The flavour in these is great and the flakiness was perfect! I did have an issue with putting my filling in the fridge, as the butter hardened and separated from the rest of the wet ingredient mix – when only going in the fridge for about 10min while I rolled the dough. Any idea where I went wrong? I ended up with uneven amounts in each tart because of this – some had lighter filling than others (I.e. more or less butter). I would’ve let the mix come to room temp for the butter to melt again but was on a time crunch.
Hi Angela,
It could be that the butter and maple syrup weren’t mixed enough before adding in the eggs. It’s important to incorporate those two ingredients really well, so when the eggs and sugar are added it creates a really nice emulsification. The inital mixing breaks the butter up into really small pieces. Then, the emulsification of the syrup suspends those small droplets of butter in the mixture, so they can’t group up and harden into large pieces. This way, when you mix the filling up again it all comes back together nicely.
If you are worried about this happening again in the future, leave the mixture on your counter while you work. The refrigerator is a precaution, because of the raw egg, but it sounds like you worked really quickly through the dough. The filling is teachnically safe to sit out for over an hour.
Oh! Also, I know I say not to use a whisk when adding in the eggs, sugar, and flavorings, because it aerates the filling. But if I had to choose between some bubbles and not having a well mixed filling, I’d choose the bubbles every time. In fact, I wouldn’t hate you using an immersion blender or stand blender (on low speed) if it means the butter can get reincorporated into the filling in a meaningful way. If a blender is needed, I do recommend slowly mixing the filling afterwards with a spatula, to knock out some of the bubbles created by the blades.
Thank you so much for your question! I hope this helps!