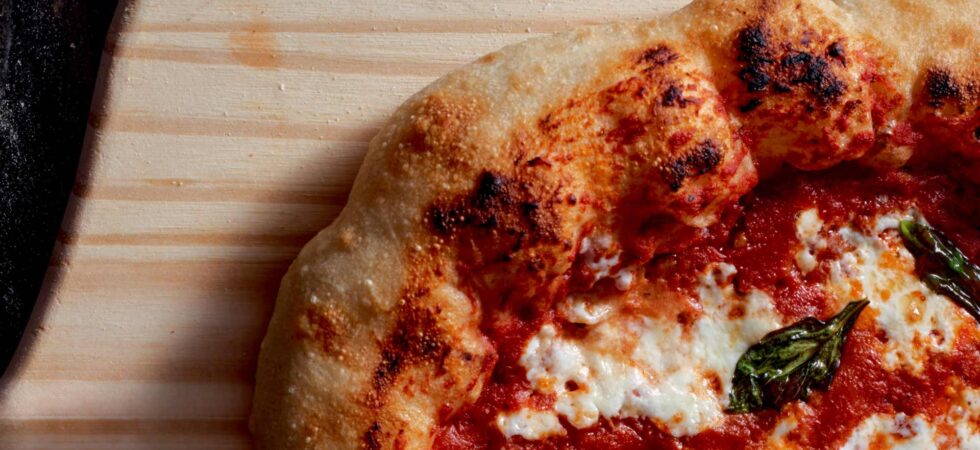
Get the Recipe: Neapolitan-Style Margherita Pizza
68% hydration, 00 & AP flours, plus a 48 hour cold proof make this crust the perfect soft, yet chewy, vessel for simply delicious and classic pizza.
Ingredients
Neapolitan-style Pizza Dough
- 2 cups King Arthur all purpose flour
- 2 cups King Arthur 00 flour
- ⅔ + ¾ cup warm water, split as written
- 1 tsp honey
- ½ teaspoon active dry yeast
- 1½ tablespoons Diamond Crystal kosher salt
- 1 tablespoon extra virgin olive oil
Margherita Pizza Sauce
- 1, 14 oz can of whole, peeled tomatoes (preferably San Marzano tomatoes)
- 1 tablespoon extra virgin olive oil
- 2 cloves roasted garlic
- 1 teaspoon Diamond Crystal kosher salt
- 3-4 large, fresh basil leaves, ripped or chopped
Neapolitan-style, Margherita Pizza
- ¼ cup semolina flour
- 3 equal pieces of pizza dough, (roughly 335g each)
- ¼ cup extra virgin olive oil
- 6-8 tablespoons tomato sauce
- 1 bunch fresh basil leaves
- ½ cup fresh mozzarella
Equipment
- 1 small bowl
- 2 medium bowls
- 1 digital food thermometer
- 1 stand mixer (optional)
- 1 very large bowl or lidded tupperware
- press and seal or cling wrap
- 1 bench scraper
- 1 pizza stone or steel
- 1 Pizza Peel
Print Recipe
Instructions
Neapolitan-style Pizza Dough
- Mix together ⅔ cup (156ml) of warm water (between 110-115°F or 43-46°C) and honey in the bowl of a stand mixer (see notes for pizza dough without a stand mixer). Next, add in the active dry yeast and let everything rest for 10-20 minutes so the yeast can bloom. While you wait, combine the two flours in a small bowl and set aside. Next, dissolve the salt in ¾ cup (175ml) of warm water and set that aside as well.
- Once your yeast mixture has bloomed, turn the stand mixer on low and begin adding the flour a little at a time. Once half of the flour is added, pour the salt water into the main mixing bowl. Then, gently add in the rest of the flour. The dough is going to come together quickly, so be ready. Once all of those ingredients are incorporated add in the olive oil until just mixed in, turn off the stand mixer, and cover for 5-10 minutes to rest.
- After this quick rest, you are going to fold the dough into itself. To do this hold onto the bowl with one hand and with the other hand take your fingers and quickly pull the bottom of the dough up and over towards the middle of the ball turning the bowl in a circle as you go for about 1-2 minutes. Rest and repeat every 10-15 minutes, until the dough becomes shiny and smooth, and you can gently touch it without it sticking to your fingers. Typically about 3-4 turns.
- Now, lightly oil a large bowl, to help the dough from sticking while it proofs. scrape the dough into bowl and cover (see notes on coverings). Set it on the counter for 1-2 hours or until it doubles in size. Then, gently carry the bowl of proofed dough to the refrigerator and place it inside. Let it chill and cold-proof for 48 hours.
- For the day of, place an oven rack onto the the top rack of your oven and place your pizza stone/steel onto that rack. Pre-heat your oven for a minimum of an hour at 550°F (288°C). (see FAQs for pizza oven cooking instructions)
- Now that the dough is cold-proofed adequately, scrape it onto a floured counter and then place it on a kitchen scale, to see its total weight in grams. Divide the total weight by 3 and cut it into equal pieces. (I'm ususally around 280-285g per piece.) Shape each piece into small balls by pulling the bottom of the dough up and over towards the middle of the ball from all four corners. Then turn it 45 degrees and fold from the bottom again. Turn the whole thing over making sure the folds stay tucked and gently rotate and shape the dough finalizing your sphere. Set your dough balls onto a covered, silpat lined baking sheet or into separate, lidded containers with enough space to more than double in size. Proof for another 3-4 hours.
Margherita Pizza Sauce
- While the dough rests prep your toppings and make your sauce. For the sauce, pour the whole peeled tomatoes and their juice into a med bowl. Using your hands crush the tomatoes into a sauce, throwing away the tough, yellow tops of the tomatoes. Add in the salt, garlic, olive oil, and basil. Mix and let sit until you are ready to make the pizzas.
Neapolitan-style Margherita Pizza
- When ready, flatten one of the dough balls with your fingers on a lightly floured surface and shape it into a roughly 10in (25cm) in diameter pizza (see FAQs for shaping tips).
- Put it on a semolina dusted pizza peel and spoon on about 2 tablespoons (30ml) of tomato sauce. Spread the sauce around, leaving a 1in (2.54cm) border for the crust and brush that border with some olive oil. Slide the pizza onto the baking steel, in the oven, and bake for 3-4 minutes. Once cooked and stiff enough, remove the half-cooked pizza from the oven using the peel. Then, add sliced or more rustically ripped mozzarella pieces to the pizza and return the pizza to the oven. Cook for another 3-4 minutes. (If you want, you can turn your oven to broil at this point, to really get some nice char on the crust.)
- Take the pizza out when you are satisfied and slide it onto a cutting surface. Add some fresh basil and additional olive oil to taste. Wait at least 5 minutes in between pizzas to let the oven come back to temperature before you bake another.
Notes
- The reason I say the stand mixer is optional, is because it's really only used for incorporating the ingredients into a dough. Feel free to use a fork and then a spatula or bench scraper if you don't have a stand mixer.
- You can continue using a mixer to develop gluten if you'd like. I do find the final dough is similar, but the mixer's dough comes out a bit chewier. I prefer to use my hands in gluten formation for this reason and have written the instructions accordingly. :)
- I like to cover bowls of proofing dough with disposable plastic shower caps. 1. I can rinse and re-use them. 2. And, they cling around the bowls tightly, unlike damp towels. (Cling wrap/film is another option, but it's basically single use.)
- I've seen sites that say you don't need to bloom your active dry yeast anymore because the grains are smaller now. Fleischmann's website still says "Add to wet ingredients and bloom," for it's Active Dry yeast, so I'm sticking to blooming.
Nutrition
Serving: 1pizza | Calories: 892kcal | Carbohydrates: 133g | Protein: 22g | Fat: 29g | Saturated Fat: 6g | Polyunsaturated Fat: 3g | Monounsaturated Fat: 18g | Cholesterol: 15mg | Sodium: 3808mg | Potassium: 293mg | Fiber: 5g | Sugar: 4g | Vitamin A: 270IU | Vitamin C: 2mg | Calcium: 130mg | Iron: 8mg