Classic Neapolitan-Style Margherita Pizza
As far as I’m concerned, good crust = good pizza, so Neapolitan-style Margherita pizza is by far my favorite.
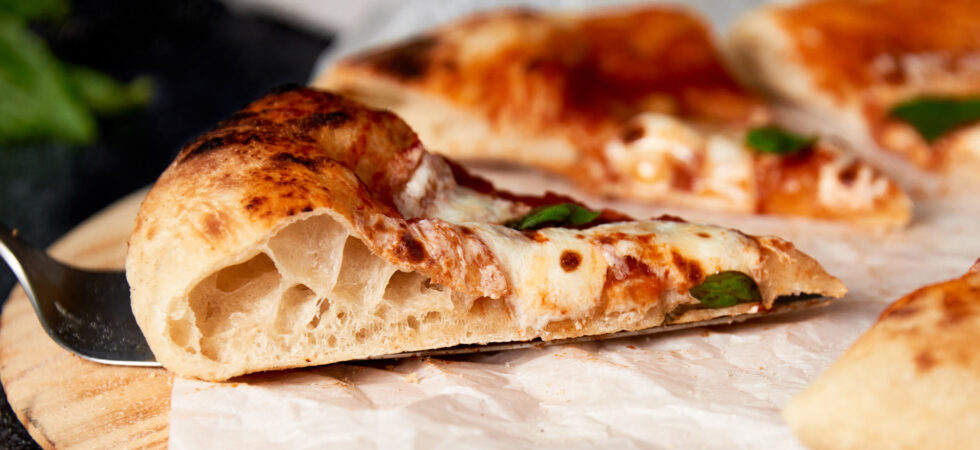
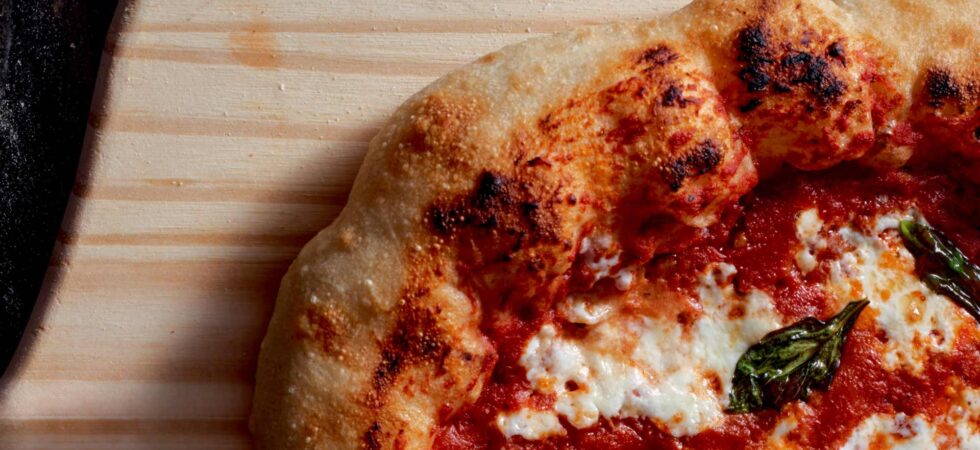
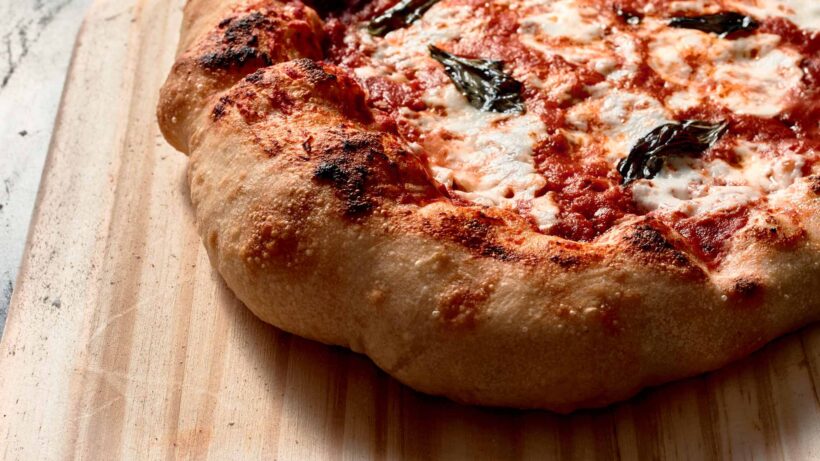
Give me char, give me big air pockets, give me slight chew and crunch on the outside with a soft inside. Combine that with a simple tomato sauce, fresh mozzarella, and a few simple toppings and you have one DELICIOUS pizza.
This Neapolitan-style Margherita pizza recipe uses a combination of 00 and AP flours for that soft, yet, chewy crust as well as a 48 hour cold-proof, to build flavor and a supremely puffy dough structure. Just look at that cross-section!
Get the Recipe: Neapolitan-Style Margherita Pizza
Ingredients
Neapolitan-style Pizza Dough
- 2 cups King Arthur all purpose flour
- 2 cups King Arthur 00 flour
- ⅔ + ¾ cup warm water, split as written
- 1 tsp honey
- ½ teaspoon active dry yeast
- 1½ tablespoons Diamond Crystal kosher salt
- 1 tablespoon extra virgin olive oil
Margherita Pizza Sauce
- 1, 14 oz can of whole, peeled tomatoes (preferably San Marzano tomatoes)
- 1 tablespoon extra virgin olive oil
- 2 cloves roasted garlic
- 1 teaspoon Diamond Crystal kosher salt
- 3-4 large, fresh basil leaves, ripped or chopped
Neapolitan-style, Margherita Pizza
- ¼ cup semolina flour
- 3 equal pieces of pizza dough, (roughly 335g each)
- ¼ cup extra virgin olive oil
- 6-8 tablespoons tomato sauce
- 1 bunch fresh basil leaves
- ½ cup fresh mozzarella
Equipment
- 1 small bowl
- 2 medium bowls
- 1 digital food thermometer
- 1 stand mixer (optional)
- 1 very large bowl or lidded tupperware
- press and seal or cling wrap
- 1 bench scraper
- 1 pizza stone or steel
- 1 Pizza Peel
Instructions
Neapolitan-style Pizza Dough
- Mix together ⅔ cup (156ml) of warm water (between 110-115°F or 43-46°C) and honey in the bowl of a stand mixer (see notes for pizza dough without a stand mixer). Next, add in the active dry yeast and let everything rest for 10-20 minutes so the yeast can bloom. While you wait, combine the two flours in a small bowl and set aside. Next, dissolve the salt in ¾ cup (175ml) of warm water and set that aside as well.
- Once your yeast mixture has bloomed, turn the stand mixer on low and begin adding the flour a little at a time. Once half of the flour is added, pour the salt water into the main mixing bowl. Then, gently add in the rest of the flour. The dough is going to come together quickly, so be ready. Once all of those ingredients are incorporated add in the olive oil until just mixed in, turn off the stand mixer, and cover for 5-10 minutes to rest.
- After this quick rest, you are going to fold the dough into itself. To do this hold onto the bowl with one hand and with the other hand take your fingers and quickly pull the bottom of the dough up and over towards the middle of the ball turning the bowl in a circle as you go for about 1-2 minutes. Rest and repeat every 10-15 minutes, until the dough becomes shiny and smooth, and you can gently touch it without it sticking to your fingers. Typically about 3-4 turns.
- Now, lightly oil a large bowl, to help the dough from sticking while it proofs. scrape the dough into bowl and cover (see notes on coverings). Set it on the counter for 1-2 hours or until it doubles in size. Then, gently carry the bowl of proofed dough to the refrigerator and place it inside. Let it chill and cold-proof for 48 hours.
- For the day of, place an oven rack onto the the top rack of your oven and place your pizza stone/steel onto that rack. Pre-heat your oven for a minimum of an hour at 550°F (288°C). (see FAQs for pizza oven cooking instructions)
- Now that the dough is cold-proofed adequately, scrape it onto a floured counter and then place it on a kitchen scale, to see its total weight in grams. Divide the total weight by 3 and cut it into equal pieces. (I'm ususally around 280-285g per piece.) Shape each piece into small balls by pulling the bottom of the dough up and over towards the middle of the ball from all four corners. Then turn it 45 degrees and fold from the bottom again. Turn the whole thing over making sure the folds stay tucked and gently rotate and shape the dough finalizing your sphere. Set your dough balls onto a covered, silpat lined baking sheet or into separate, lidded containers with enough space to more than double in size. Proof for another 3-4 hours.
Margherita Pizza Sauce
- While the dough rests prep your toppings and make your sauce. For the sauce, pour the whole peeled tomatoes and their juice into a med bowl. Using your hands crush the tomatoes into a sauce, throwing away the tough, yellow tops of the tomatoes. Add in the salt, garlic, olive oil, and basil. Mix and let sit until you are ready to make the pizzas.
Neapolitan-style Margherita Pizza
- When ready, flatten one of the dough balls with your fingers on a lightly floured surface and shape it into a roughly 10in (25cm) in diameter pizza (see FAQs for shaping tips).
- Put it on a semolina dusted pizza peel and spoon on about 2 tablespoons (30ml) of tomato sauce. Spread the sauce around, leaving a 1in (2.54cm) border for the crust and brush that border with some olive oil. Slide the pizza onto the baking steel, in the oven, and bake for 3-4 minutes. Once cooked and stiff enough, remove the half-cooked pizza from the oven using the peel. Then, add sliced or more rustically ripped mozzarella pieces to the pizza and return the pizza to the oven. Cook for another 3-4 minutes. (If you want, you can turn your oven to broil at this point, to really get some nice char on the crust.)
- Take the pizza out when you are satisfied and slide it onto a cutting surface. Add some fresh basil and additional olive oil to taste. Wait at least 5 minutes in between pizzas to let the oven come back to temperature before you bake another.
Notes
- The reason I say the stand mixer is optional, is because it’s really only used for incorporating the ingredients into a dough. Feel free to use a fork and then a spatula or bench scraper if you don’t have a stand mixer.
- You can continue using a mixer to develop gluten if you’d like. I do find the final dough is similar, but the mixer’s dough comes out a bit chewier. I prefer to use my hands in gluten formation for this reason and have written the instructions accordingly. 🙂
- I like to cover bowls of proofing dough with disposable plastic shower caps. 1. I can rinse and re-use them. 2. And, they cling around the bowls tightly, unlike damp towels. (Cling wrap/film is another option, but it’s basically single use.)
- I’ve seen sites that say you don’t need to bloom your active dry yeast anymore because the grains are smaller now. Fleischmann’s website still says “Add to wet ingredients and bloom,” for it’s Active Dry yeast, so I’m sticking to blooming.
Nutrition
Frequently Asked Questions
Sure do!
2. Water heater temperatures are traditionally set to 120°F (49°C) to protect against burns. So, let your water heat to what feels hot to touch and that’s typically very close to our 110-115°F (43-46°C) range for blooming the yeast.
1. Additionally, if you warm the mixing bowl ahead of time by filling it with tap-hot water and then pouring it out before adding the warmed water and honey there shouldn’t be more than a 1-2 degree change in your mixture’s temperature making the process much less finicky.
3. I prefer to bloom yeast separately, instead of in a poolish. This way I can make sure my yeast is still live (activated or fresh) before adding salt or flour and no fermentation happening. It’s much less of a loss to toss my failed bloom than an entire loaf that isn’t proofing.
There may be 3 reasons your yeast doesn’t bloom:
1. Your yeast expired (literally). Check the expiration date on your active dry yeast packets or jar before using. I, personally, like to label my jar with the date I open it and replace it every 6 months to make sure I don’t have any issues. If your yeast isn’t alive to begin with, it won’t start converting simple and complex carbohydrates (sugars) into carbon dioxide. No bubbles = no rise.
2. Your water was too cold. If your water temperature is lower than the specified range, it may not activate the yeast at all or activate very little, which slows the fermentation process substantially.
3. Your water was too hot. If the water temperature is 120°F (49°C) or higher, it will kill the yeast and then there will be nothing to start the fermentation process. Without fermentation, your bread will have no leavening agent and will be flatter than a pancake. There’s baking soda and powder in pancakes! 😉
2 simple reasons:
1. A more concentrated sugar to water ratio allows for better yeast bloom.
2. Dissolving the salt in warm water guarantees it gets evenly distributed throughout the crust.
TLDR… It will still be a delicious pizza.
Long answer… First, the 00 refers to how finely ground the flour is which ranges from 00 to 2. 00 flour is the finest level of ground flour, and is typically made from durum wheat. Durum wheat has great structure but less elasticity than their red wheat counterparts (all purpose and bread flours). Simply put, doughs with 00 flour in them are less chewy, making them ideal for the softer and lighter texture of Neapolitan style pizzas. But that’s not everything you need to know.
So, let’s talk protein… Most 00 pizza flours have a higher amount of protein (12-13%). However, the King Arthur 00 Flour, which is what is stocked at my local grocery store, has 10.5%. This allowed me to experiment mixing in their higher protein all purpose flour (11.7%), in order to add chew without greatly affecting the softness I was after in the crust. I found that sticking to a protein content around 11-12%, with a mix of durum and red wheat, seems to work well for my prefered textural results.
Here is a little breakdown for you:
– 00 flour’s protein is between 10.5-13%. It will create a soft yet structured pizza crust because of the fine mill and the type of wheat (durum).
– All purpose flour’s protein is between 10 and 11.7%. It will give some more chew and body to your crust because of the coarser mill and the type wheat (red).
-Bread flour’s protein is between 12-14%. It will add yet more chew a bit of crunchiness and produce a thicker pizza crust (think NY style pizza).*
*I would not recommend only using bread flour. But, believe it can be used effectively when mixed with lower protein all purpose or 00 flours. I would also say to go easy on the ratio of bread flour to whatever other flour you use.
All that to say, the range in protein between all purpose and 00 flours are similar enough that they can be used interchangeably. There will be some textural differences, but the neapolitan style margherita pizza will still be delicious. Mix and match to your heart’s content!
I know, I know 48 hours of cold-proofing has you saying, “Kari what are you nuts?!” That number can be cut down to 24 hours, but the flavor will be less pronounced and the gluten structure will be weaker when the pizza bakes. This means it’s not going to puff up and hold those beautiful bubbles as well.
Another option for my “are we there yet” people is to knock down the dough after it doubles in size, instead of putting it into the refrigerator. Then, simply, leave then dough on the kitchen counter for 16 hours. The structure and flavor is very similar to the 24 hour, cold-proofed dough.
Absolutely! Push from the middle to the edges, to form a small circle with a slightly pronounced rim. Flip the dough over and press again. At this point you can stretch by rotating the dough over your knuckles in a circle. You can also place your non-dominant hand over the middle of the dough and use your dominant hand to flip the dough back and forth over your other hand. It will immediately stretch the dough out. Rotate as you go for a circular shape. Feel free to pull and press with your fingers as needed to stretch and reshape your pizza. Just be careful not to let any sections get too thin (see through) or break.
The trick to getting the pizza off the peel and onto the pizza stone with its shape intact is twofold. First, make sure to spread either cornmeal or semolina onto the peel before placing down the stretched dough. These coarse flours will not incorporate into the dough and allow the pizza to roll freely on top of the peel.
Second, when you go to place the pizza in the oven, touch the end of the peel about 2/3rds of the way across the pizza steel. Then, give the peel a small jerk to slide the pizza off at a roughly 15-20 degree angle. As the pizza slides down pull out the peel leaving the pizza behind.
Unfortunately, it’s difficult to use the peel to turn the pizza like you could in a pizza oven because there is very little clearance at the top of an oven. If you still want to turn your pizza, you have to wait until the dough has set and begun to rise. This way you know it won’t collapse on itself as you move it. I would also recommend a metal peel for this over a wooden one because it will be thinner and easier to get under the pizza. The play is to shove the peel under the pizza in a quick jerk, pull the pizza forward, shift it 1/4 turn, push it back to the center of the steel, and jerk the peel away leaving the pizza behind.
If you are the proud new owner of a pizza oven and want to see how much of an upgrade kitchen oven to pizza oven is, here is how I use my Koda 16 Ooni oven (with natural gas hookup). I cannot speak to other ovens, even among other Ooni products. Though I am sure there is some crossover.
Of Note: Be aware pizzas cook very fast in a pizza oven. Your pizzas will be fully cooked in about 3 minutes at 700°F (371°C) or just 60 seconds at 900°F (482°C) Do not walk away from the oven once your pizza is inside.
To start, I pre-heat the pizza oven, on high, for 15-20 minutes. This ensures the stone is heated all of the way through. Before I add the pizza, I turn the temperature dial somewhere in the middle. The flames should be bright but not touching the top of the oven. Once the back has bubbled up a bit and the front is solid enough that you can slide your peel under it, rotate the pizza 180°. Then, turn down the dial to between medium and low and wait until the back bubbles up to match the front. You should have minimal spotting.
Just like with the traditional oven, take the pizza out of the oven and add the cheese to the par-baked pie. Put the pie back in. Then make quarter turns as the pizza develops color and it’s signature leopard spots of char. The cheese will bubble and might get some color, but it shouldn’t char at all. If it looks like it’s over cooking turn down the oven further and pull the pizza further away from the flames.
All in this should take 60-90 seconds for the first step and 60-90 seconds for the next step. Et Viola, Neapolitan-style Margherita pizza from a pizza oven!
You betcha! To freeze your dough, separate and shape the dough into the 3 equal pieces just after the first rise but before the 48 hour rise in the refrigerator. Place the pieces you’d like to freeze onto a lined baking tray. Put the tray in your freezer for a few hours, until the dough becomes firm. Then, close each piece of dough into a sealable plastic baggie or airtight container. Date them and place them into the freezer for up to 2 months.
To defrost frozen pizza dough, take it out of the freezer and place it into a lightly oiled and covered bowl in your refrigerator. At this point you would let your dough defrost and undergo it’s 48 hour cold proof.
A dough piece from this recipe will take at least 4 hours to defrost in your refrigerator, so include that into your proofing calculations. If you’d like to speed things up a bit, you can place the defrosting dough (in it’s covered bowl) on your kitchen counter. It can be left for 1-2 hours to defrost before moving to the refrigerator for it’s cold proof.
Once cold-proofed, knock back the pizza dough, reshape it, and let it rise (covered) on the counter. Act as if you had just completed the separating into three equal parts step. Follow the recipe instructions from there on out.


There may be affiliate links in this post. A Little Spoon, LLC is a participant in affiliate advertising programs designed to help content creators earn fees by linking to affiliated sites.
Been a professional chef for 40 years this is the best crust ever. I’m totally ruined for any other pizza. Don’t over work dough.
Hi! thank you so much for your comment. It made my day! 🙂 I wholeheartedly agree about overworking the dough! I, personally, treat this the same way I treat focaccia. Turns, yes. Kneading, no!